【iOSDC2024 #LT】2. Using Core MIDI to create an app that works with a digital piano
This article summarizes the method of connecting devices using CoreMIDI from the LT session presented at iOSDC2024, I Got an Electric Piano at Home, So I Made an App That Connects with It!.
The previous article was “1. About MIDI”.

In this article, I will summarize the implementation of connecting an electric piano with devices like an iPad using MIDI and how the app handles the data retrieved from the piano.
The app implemented this time has the following UI:
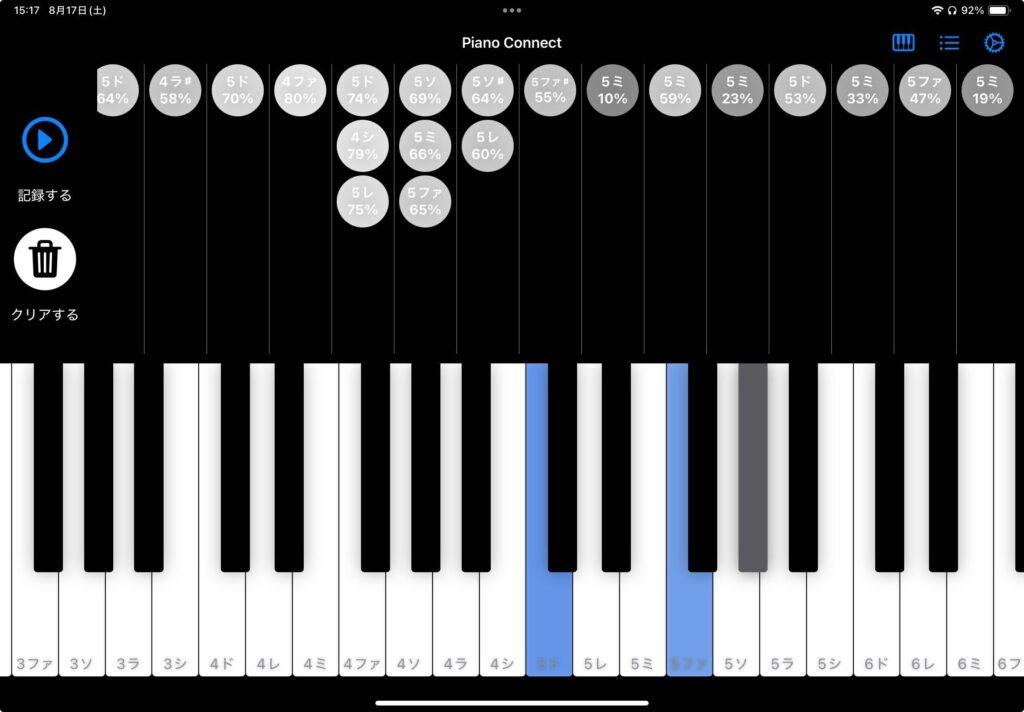
When you play the keys on the connected electric piano, the information, specifically the note name of the key played and the intensity, is displayed at the top of the screen.
Also, while the key is being pressed, the color of the corresponding key on the on-screen keyboard changes, with the intensity of the color varying according to the strength of the press.
Overview of Connecting to an Electric Piano Using MIDIKit
Let’s start by summarizing the connection implementation with the electric piano using the aforementioned MIDIKit.
In this app, a class called MidiHelper was implemented, and the connection processing using MIDI is centralized here.
This class conforms to MidiHelperProtocol, so it can be swapped with a mock, etc., if necessary.
Similarly to the sample app, the ObservableMIDIManager generated in the View at initialization is passed to this class as a variable called midiManager.
Basic connection processing and data transmission and reception are handled using this midiManager.
The connection process is as follows:
try midiManager?.start()
try midiManager?.addInputConnection(
    to: .allOutputs,
    tag: MidiHelper.Tags.midiIn,
    receiver: .events { [weak self] events, timeStamp, source in
        self?.received(timestamp: timeStamp, midiEvents: events)
    }
)
try midiManager?.addOutputConnection(
    to: .allInputs,
    tag: MidiHelper.Tags.midiOut
)
Here, the midiManager start process is first executed.
Then, a connection is created and added with the electric piano registered as the input.
This allows you to receive note information and other data from the piano’s keypresses through a callback.
The .allOutputs specified in to: registers all devices that can be connected as inputs.
If you want to connect to individual devices, you need to retrieve that information separately and specify the device as an input.
Additionally, the electric piano is specified as an output, and a connection is created.
This allows the MIDI information sent from the device, such as playing the C4 key with a velocity of 100, to be sent to the connected electric piano and produce that sound.
By the way, when outputting from the device to the electric piano, it is important to properly send both events to ensure that the key is released after the “key press” event is sent; otherwise, the key will not be released, and no sound will be produced when you press the key on the piano.
The tags in MidiHelper.Tags are standardized to be used in the UI for selecting instruments or connections to connect to individually, but if no such designation is necessary, any string will work.
This implementation can also be seen in MIDIKit’s sample code (code).
If no elaborate functions are needed, this will allow you to perform data transmission and reception with the piano.
For connections via Bluetooth, you need to set up the connection for Bluetooth devices, but the UI is provided on the CoreMIDI side.
MIDIKit offers a sample screen wrapped with UIViewRepresentable, so if you want to use it in SwiftUI, I recommend referring to it (code).
For network connections, running the following function will allow you to connect over the network (reference).
However, be aware that visionOS does not support this function (although, in my testing, I was able to play the piano in GarageBand on a Mac over the network).
setMIDINetworkSession(policy: .anyone)Implementation of Note Name Definitions in the App
Next, let’s discuss how note names and other definitions are implemented within the app.
In the original CoreMIDI, note names, keypress strength, etc., are not defined as enums or similar structures; everything is retrieved manually from pointers.
While MIDIKit maps these to enums and other easy-to-handle forms, I implemented them separately to avoid dependency on MIDIKit, as these definitions are used not only for MIDI connection but also for the piano UI implementation.
The actual code can be found in the PianoUI package implemented this time, but I will summarize it here.
Note Names
Note names refer to the type of sound, such as the C in the 4th octave, which corresponds to the key’s position on the piano.
This is defined with two elements: ① Octave, and ② Note name within the octave.
The Note number has a range of 0~127, with octaves ranging from -1 to 9.
In Japan, it is commonly referred to as “Do Re Mi Fa So La Ti,” but in English, it is called “C D E F G A B.”
Therefore, I defined Octave as Octave and Do Re Mi Fa So La Ti, including sharps for black keys, as KeyType enum, and created a struct called PianoKey that includes these.
With this, by referencing Octave and KeyType, you can uniquely identify the note name and key position (implementation).
The initialization arguments allow you to specify either Octave and KeyType directly or by specifying the Note number.
Although it is a minor implementation, in this app, the note name display can be switched from the settings screen.
The following displays are supported (the settings are stored within the app using @AppStorage or UserDefaults):
- English: C D E F G A B
- German: C D E F G A H
- Italian: Do, Re, Mi, Fa, Sol, La, Si
- Italian (Katakana): ドレミファソラシ
- Japanese: いろはにほへと
Information Such as Key Press Intensity
The actual information sent from the electric piano via MIDI includes, in addition to the PianoKey information mentioned above, a timestamp, keypress intensity, whether the key is being pressed or released, etc.
To handle these, the following struct is defined:
public struct PianoKeyStroke: Equatable, Identifiable, Hashable, Codable {
    public let key: PianoKey
    public let velocity: Int
    public let timestampNanoSecond: UInt64
    public let isOn: Bool
}
timestampNanoSecond is defined as a UInt64 type because the CoreMIDITimeStamp type handled by MIDI is a typealias for UInt64, so it is defined as a UInt64 type.
Since the velocity is sent in the range of 0~127, getters are defined within this struct to handle it easily in the range of 0~1 (mainly used for Opacity operations on the UI side) or as a percentage (mainly used when displaying it in Text).
The PianoView mentioned later is designed to take an array of these PianoKeyStroke as an initialization argument and display the keyboard UI according to that value.
In this app, the values received from MIDIKit in MidiHelper or those sent from the UI side to the electric piano are converted to and from PianoKeyStroke for mutual exchange.
The conversion of PianoKey can be easily performed by converting it to a Note number.
Handling Keys Pressed Almost Simultaneously as a Single Group
One slightly complicated specification in this app is that keys pressed simultaneously are displayed as a single group.

Looking at the upper part of the app’s screenshot again, you can see that the keys pressed individually are separated into individual groups, but the keys pressed simultaneously are grouped into a single group of three.
However, while this feels simultaneous to the pianist, the actual timestamp recorded in MIDI is in UInt64, making it virtually impossible to press the keys precisely at the same time.
Therefore, the incoming values must be grouped into an array within a certain time frame, and the next note should be grouped into another array based on a similar time frame.
Moreover, since the required time unit was 30 milliseconds (changeable from the settings screen), implementing this manually would be quite challenging.
So, in this case, since I was already using Combine to pass values from MIDIHelper to the UI side (I am still not accustomed to AsyncStream…), I used Combine’s Operator.
I initially thought I would need to combine and create my own Operator, but there was a perfectly suitable Operator called collect.
Collect aggregates the values held until the specified time or specified number is reached and then sends them as an array (how convenient!).
Based on this, I implemented the following function:
func bufferThrottle(for interval: DispatchQueue.SchedulerTimeType.Stride, scheduler: DispatchQueue) -> AnyPublisher<[Output], Failure> {
    return self
        .collect(.byTime(scheduler, interval))
        .eraseToAnyPublisher()
}
Since the specified time, such as 30 milliseconds, is the standard in this case, .byTime is specified, and the time and scheduler are passed as arguments.
This allows the original PianoKeyStroke to be converted into an array of PianoKeyStroke and sent.
Conclusion
In this article, I summarized the implementation of connecting MIDI-compatible instruments with devices like iPhone using CoreMIDI and how to define and process musical information within the app.
The next article is “3. Creating a Piano UI Using Layout Protocol”.