【iOSDC2024 #LT】4. I tried making a slideshow using SwiftUI animations
This article summarizes the implementation of animations in the presentation slides from the LT session, I Got a Digital Piano at Home, So I Made an App that Works with the Piano!, which was presented at iOSDC2024.
The previous article was “3. Creating a Piano UI Using the Layout Protocol.”
The presentation slides were created using SlideKit, which allows for creating slides with SwiftUI.
This means that, in addition to using the slide template Views provided by SlideKit, you can also incorporate custom Views to create visually unique and impactful presentations that are not possible with general slide tools.
For example, the presentation begins with an animation where a music score book opens, revealing a treble clef 🎼 that changes colors, as shown below.
I’ll discuss the AutoScrollTextView at the bottom of the slides in the next article.
I also included the following animations in the middle of the slides.
All of these animations were implemented using SwiftUI.
I’ll introduce how some of these animations were implemented.
For more detailed information, please refer to the actual source code.
Opening Animation: Color-Changing Treble Clef + Book Opening
First, let’s look at the opening animation.
For the book opening animation, I’ve previously written an article on it, which you can refer to.
This time, in addition to that animation, I’ve added animations for movement with offset and scaling.
How is the color-changing treble clef animation structured?
Here is the actual code. The key lies in how you use AngularGradient and the mask modifier.
struct MusicNoteMaskView: View {
    let colorfulGradient = Gradient(
        colors: [.red, .orange, .yellow, .green, .blue, .purple, .pink]
            .map({ (color: Color) in color.opacity(0.8) })
    )
    @State private var gradientAngle: Angle = .degrees(0)

    var body: some View {
        AngularGradient(
            gradient: colorfulGradient,
            center: .leading,
            angle: gradientAngle
        )
        .mask({
            Image(.trebleClef)
                .resizable()
                .scaledToFit()
        })
        .onAppear {
            withAnimation(.linear(duration: 4).repeatForever(autoreverses: false)) {
                gradientAngle = .degrees(360)
            }
        }
    }
}
The background color-changing gradient part is implemented using AngularGradient.
When you pass a Gradient with a specified array of colors to this AngularGradient, you can implement a gradient View that looks like this:
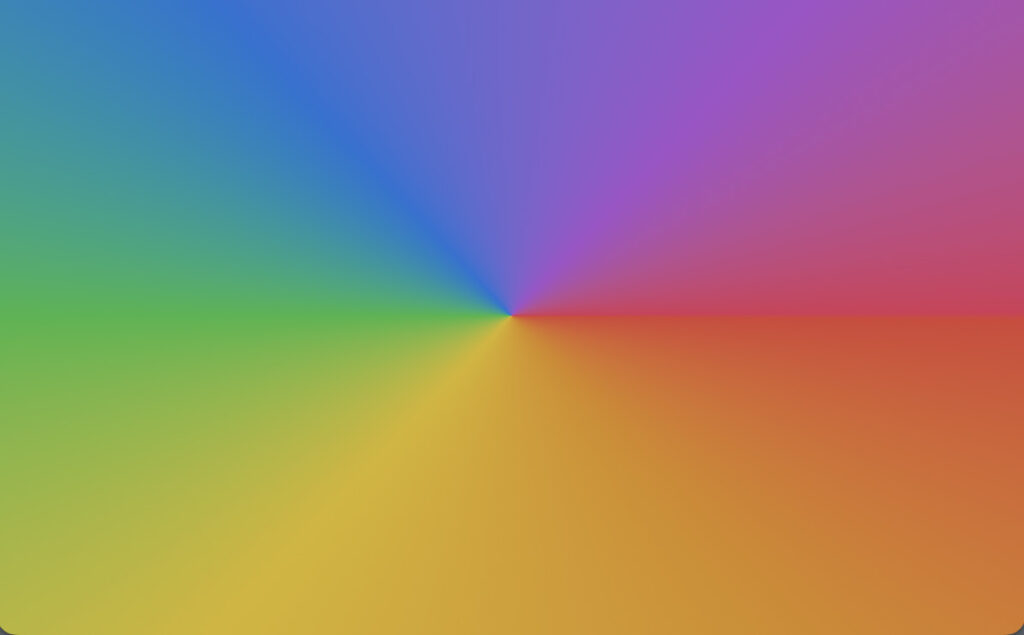
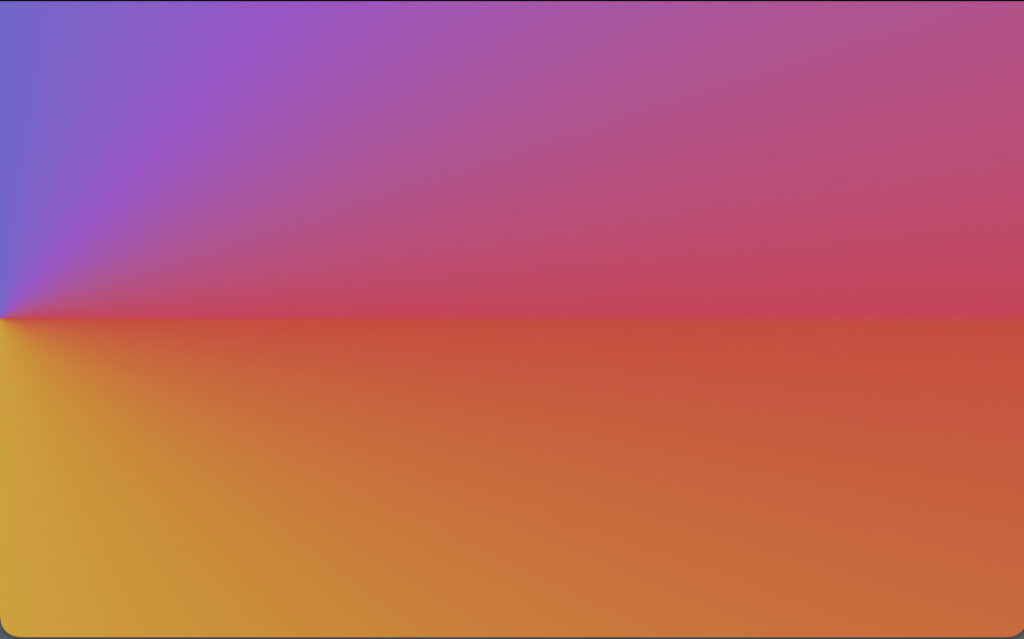
If you set the anchor to leading or trailing, the center point shifts left or right.
With that setup, you run the animation as follows:
You start with an angle of 0° and animate it to 360°, making a full rotation over a specified time (4 seconds in this case).
It’s important to note that by specifying repeatForever(autoreverses: false), the animation continues after completing the 360° rotation, and the animation does not play in reverse, allowing the animation to loop.
withAnimation(.linear(duration: 4).repeatForever(autoreverses: false)) {
    gradientAngle = .degrees(360)
}
Finally, by masking the prepared treble clef image, the gradient View is cut out in the shape of the treble clef.
.mask({
    Image(.trebleClef)
        .resizable()
        .scaledToFit()
})
And with that, the color-changing treble clef is complete! 🎉
Text Sliding Up to Switch Animation
Next, let’s look at how to implement this animation.
Once again, the key is how you use gradients and masks.
var body: some View {
VStack(alignment: .center, spacing: 40) {
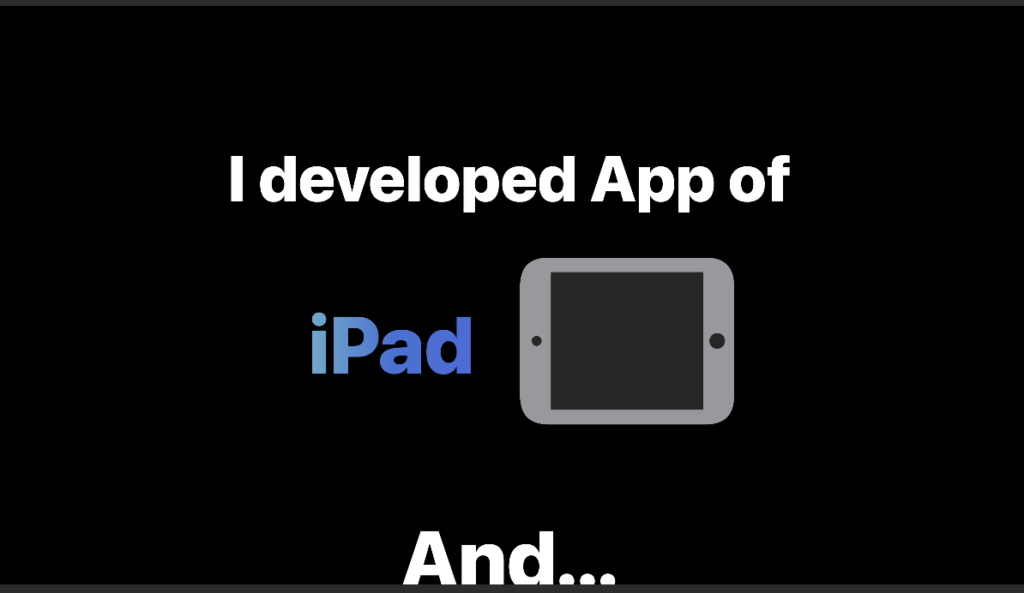
Text("I developed App of")
.foregroundStyle(.white)
.font(.system(size: 120, weight: .heavy))
.offset(y: osNameHeight)
VStack(spacing: 0) {
HStack(alignment: .center, spacing: 40) {
LinearGradient(
colors: [
Color(hex: "73BBC5"),
Color(hex: "4072D8"),
Color(hex: "436BDD"),
],
startPoint: .leading,
endPoint: .trailing
)
.frame(width: 400)
.mask {
Text("iPad")
.font(.system(size: 150, weight: .heavy))
}
Image(systemName: "ipad.gen1.landscape")
.resizable()
.foregroundStyle(.gray)
.aspectRatio(contentMode: .fit)
.frame(width: osNameHeight)
}
.frame(height: osNameHeight)
Text("And...")
.font(.system(size: 150, weight: .heavy))
.foregroundStyle(.white)
.frame(height: osNameHeight)
HStack(alignment: .center, spacing: 40) {
LinearGradient(
colors: [
Color(hex: "393EE2"),
Color(hex: "E86780"),
Color(hex: "C8BBE2"),
],
startPoint: .leading,
endPoint: .trailing
)
.frame(width: 780, height: osNameHeight)
.mask {
Text("Vision Pro")
.font(.system(size: 150, weight: .heavy))
.frame(height: osNameHeight)
.shadow(radius: 10)
}
Image(systemName: "visionpro")
.resizable()
.aspectRatio(contentMode: .fit)
.foregroundStyle(.gray)
.frame(height: osNameHeight * 0.6)
}
}
.offset(y: osNameHeight)
.offset(y: yOffset)
.mask { Rectangle().frame(height: osNameHeight + 10) }
}
.frame(maxWidth: .infinity, maxHeight: .infinity)
.background(.black)
.task {
if !shouldAnimated { return }
try? await Task.sleep(for: .milliseconds(800))
withAnimation {
yOffset = -osNameHeight
} completion: {
Task {
try? await Task.sleep(for: .milliseconds(600))
withAnimation(.linear(duration: 0.6)) {
yOffset += -osNameHeight
}
}
}
}
}
The basic structure places the non-animated “I developed App of” Text and the other parts in a VStack.
The three other animated Text / HStack elements are also placed in a single VStack.
The parts for “iPad” and “Vision Pro” use the Gradient and mask implementation, similar to the treble clef animation mentioned earlier.
The animated Views inside the VStack are actually masked using .mask like this, to forcibly hide areas outside the desired display area.
.mask { Rectangle().frame(height: osNameHeight + 10) }Then, all you need to do is execute the offset animation in two steps!
Note that the movement distance and mask position were manually adjusted 😅.
Treble Clef Stroke Animation
The last animation I’ll introduce is the treble clef drawing animation shown below.
The background animation with moving gradients uses the same implementation as the AngularGradient mentioned earlier.
To implement such an animation, you need to draw this shape using a Path.
However, it’s very challenging to calculate and draw such a complex shape manually with a Path.
This time, I used a tool called SVG to SwiftUI, which can convert SVG to SwiftUI paths.
I first configured the original SVG image of the treble clef in this tool and output a SwiftUI Path.
I then modified the Path to create an animated version.
struct MusicIconShape: Shape {
    var animatableData: CGFloat {
        get { animationProgress }
        set { animationProgress = newValue }
    }

    var animationProgress: CGFloat = 0

    func path(in rect: CGRect) -> Path {
        var path = Path()
        .....(Omitting path code)
        return path.trimmedPath(from: 0, to: animationProgress)
    }
}

struct MusicStrokeAnimationView: View {
    @State private var animationProgress: CGFloat = 0
    let lineWidth: CGFloat
    let duration: CGFloat

    var body: some View {
        MusicIconShape(animationProgress: animationProgress)
            .stroke(Color.blue, lineWidth: lineWidth)
            .onAppear {
                withAnimation(.linear(duration: duration) {
                    animationProgress = 1.0
                }
            }
    }
}
The key point is the definition of animatableData.
This animatableData is used by Shapes or custom Views to track animation progress, and it’s part of the Animatable Protocol that supports SwiftUI’s animation system.
Since View and Shape inherently conform to Animatable, you can define the animatableData property.
By passing animationProgress to this animatableData, the animation runs according to that progress.
To make the Path animate based on animationProgress, you need to trim the Path like this in the final return process:
path.trimmedPath(from: 0, to: animationProgress)Conclusion
This time, I introduced the implementation of some of the SwiftUI animations shown in the slides.
For the rotating musical note UI, you can check the source code to understand how it was implemented.
It’s mostly a combination of the Layout Protocol introduced in the previous article and TimelineView.
The next article is “5. Implementation of AutoScrollView”.