Try flying a drone with Swift
This article is a detailed article of the announcement at Swift Lovers Association vol49 @ JapanTaxi. Click here for the presentation slides.
I was interested in the entertainment using the drone shown in the slide above, and it seemed to be the material for the announcement of the lovers’ association, so I bought a Tello drone and played with it.
How it works
As shown in the figure below, connect the drone to a terminal such as an iPhone via UDP communication. After that, send the specified command and the drone will work according to the command.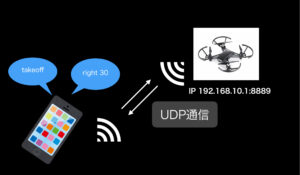
Implementation
I implemented it using NWNetwork of Network Framework by referring to this article by @eito_2. There was a video about it at WWDC 2019, so if you are interested, please. First, prepare an enum that defines a structure that summarizes drone address / port information and a command list.
Only some commands are defined, so if you want to see the list of available commands, please check the SDK 2.0 User Guide.
struct TelloConstants {
    static let ipAddress = "192.168.10.1"
    static let port: UInt16 = 8889
}

enum TelloCommands {
    case start
    case takeoff
    case land
    case emergency
    // Min: 20, Max: 500(cm)
    case left(x: Int)
    case right(x: Int)
    case forward(x: Int)
    case back(x: Int)
    case up(x: Int)
    case down(x: Int)

    // Min: 1, Max: 360(degree)
    case rotateRight(x: Int)
    case rotateLeft(x: Int)

    case flip(direction: TelloDirection)
}

extension TelloCommands {
    var asString: String {
        switch self {
        case .start: return "command"
        case .land: return "land"
        case .takeoff: return "takeoff"
        case .emergency: return "emergency"
        case .left(let x): return "left (x)"
        case .right(let x): return "right (x)"
        case .forward(let x): return "forward (x)"
        case .back(let x): return "back (x)"
        case .up(let x): return "up (x)"
        case .down(let x): return "down (x)"
        case .rotateRight(let x): return "cw (x)"
        case .rotateLeft(let x): return "ccw (x)"
        case .flip(let direction): return "flip (direction.asString)"
        }
    }
}

enum TelloDirection {
    case left
    case right
    case forward
    case back

    var asString: String {
        switch self {
        case .left: return "l"
        case .right: return "r"
        case .forward: return "f"
        case .back: return "b"
        }
    }
}
Next is the implementation that connects to the drone and actually sends the command.
By setting a closure in stateUpdateHandler at the time of init, it is possible to check the connection status with the drone.
In addition, we have prepared the following three methods.
- After receiving the enum of the command and the response after executing the command, notify the specified closure of the result in Result type.
- Receives a command and returns the execution result as Single (1 wrapper method).
- Receives an array of commands and the number of seconds in the command execution interval, executes the commands in order, and returns the execution result in Observable.
class TelloManager {
    let connection = NWConnection(host: .init(TelloConstants.ipAddress), port: .init(integerLiteral: TelloConstants.port), using: .udp)

    init() {
        connection.stateUpdateHandler = { [unowned self] state in
            switch state {
            case .setup:
                print("Setup")
            case .waiting(let error):
                print(error)
            case .preparing:
                print("preparing")
            case .ready:
                self.connection.start(queue: .global())
                print("ready")
            case .failed(let error):
                print(error)
            case .cancelled:
                print("cancelled")
            @unknown default:
                fatalError("Unknown error")
            }
        }
    }

  //1.コマンドのenumを受け取り、コマンド実行後のレスポンスを受信後、指定のクロージャにResult型で結果を通知する。
    func send(command: TelloCommands, completion: @escaping ((Result<String, Error>) -> Void)) {
        print("Commands: ", command.asString)
        let message = command.asString.data(using: .utf8)
        connection.send(content: message, contentContext: .defaultMessage, isComplete: true, completion: .contentProcessed({ error in
            if let error = error {
                completion(.failure(error))
            }
        }))
        connection.receive(minimumIncompleteLength: 0, maximumLength: Int(Int32.max)) { (data, context, isComplete, error) in
            if !isComplete, let error = error {
                completion(.failure(error))
            } else if let data = data, let message = String(data: data, encoding: .utf8) {
                completion(.success(message))
            } else {
                print("Unknown error")
            }
        }
    }

    //2.コマンドを受け取り、その実行結果をSingleで返す(1のラッパーメソッド)。
    func send(command: TelloCommands) -> Single<String> {
        return Single<String>.create { [unowned self] single -> Disposable in
            self.send(command: command) { result in
                switch result {
                case .success(let message):
                    single(.success(message))
                case .failure(let error):
                    single(.error(error))
                }
            }
            return Disposables.create()
        }
    }

    //3.コマンドの配列とコマンド実行間隔の秒数を受け取り、そのコマンドを順に実行し、その実行結果をObservableで返す。
    func sends(parameters: (commands: [TelloCommands], interval: Int)) -> Observable<String> {
        let commandsObservables = parameters.commands.map(send)
            .map({ $0.asObservable().delay(.seconds(parameters.interval), scheduler: MainScheduler.instance) })
        return Observable.concat(commandsObservables)
    }
}
The implementation of ViewController is as follows. Due to the restrictions of this drone, the command command must be sent first, so tap the setup button before starting the subsequent operations. After that, tap the takeoff button to take off, press the land button to land, and press pattern1 to “take off-> 60 cm up-> 30 cm down-> move 100 cm to the left-> move 100 cm to the right-> flip forward-> flip back. → “Landing” is executed. By the way, Flip works like this.
class ViewController: UIViewController {

    @IBOutlet weak var setupButton: UIButton!
    @IBOutlet weak var takeOffButton: UIButton!
    @IBOutlet weak var landButton: UIButton!
    @IBOutlet weak var rightButton: UIButton!
    @IBOutlet weak var leftButton: UIButton!
    @IBOutlet weak var pattern1Button: UIButton!

    private let resultRelay = PublishRelay<String>()
    private let disposeBag = DisposeBag()
    private let tello = TelloManager()

    override func viewDidLoad() {
        super.viewDidLoad()

        setupButton.rx.tap.throttle(.seconds(1), scheduler: MainScheduler.instance)
            .map({ _ in .start })
            .flatMap(tello.send)
            .bind(to: resultRelay)
            .disposed(by: disposeBag)
        takeOffButton.rx.tap.throttle(.seconds(1), scheduler: MainScheduler.instance)
            .map({ _ in .takeoff })
            .flatMap(tello.send)
            .bind(to: resultRelay)
            .disposed(by: disposeBag)
        landButton.rx.tap.throttle(.seconds(1), scheduler: MainScheduler.instance)
            .map({ _ in .land })
            .flatMap(tello.send)
            .bind(to: resultRelay)
            .disposed(by: disposeBag)
        rightButton.rx.tap.throttle(.seconds(1), scheduler: MainScheduler.instance)
            .map({ _ in .right(x: 100) })
            .flatMap(tello.send)
            .bind(to: resultRelay)
            .disposed(by: disposeBag)
        leftButton.rx.tap.throttle(.seconds(1), scheduler: MainScheduler.instance)
            .map({ _ in .left(x: 100) })
            .flatMap(tello.send)
            .bind(to: resultRelay)
            .disposed(by: disposeBag)
        pattern1Button.rx.tap.throttle(.seconds(1), scheduler: MainScheduler.instance)
            .map({ _ -> [TelloCommands] in [.takeoff, .up(x: 60), .down(x: 30), .left(x: 100), .right(x: 100), .flip(direction: .forward), .flip(direction: .back), .land] })
            .map({ ($0, 2) })
            .flatMap(tello.sends)
            .bind(to: resultRelay)
            .disposed(by: disposeBag)
        resultRelay.asObservable()
            .subscribe(onNext: { message in
                print("Message: ", message)
            }, onError: { (error) in
                print("Error: ", error)
            })
            .disposed(by: disposeBag)
    }
}
Summary
Swift usually runs only on mobile, but it was refreshing to be able to move the drone. At Try! Swift 2019, there was also an announcement to move Raspberry Pi with Swift, so I would like to touch that as well. Also, since this drone has a mechanism to receive camera information, I would like to implement it so that I can take pictures and videos by receiving that information (I gave up because I did not have time this time). .. The source code is here.
Reference
•https://www.ryzerobotics.com/jp/tello •https://qiita.com/eito_2/items/0d9e2c92b0be0ea16e77 •https://dl-cdn.ryzerobotics.com/downloads/Tello/Tello%20SDK%202.0%20User%20Guide.pdf