- Automatically generate log transmission code from spreadsheet log definition using Stencil
- Procedure
- 1. Convert spreadsheet information to JSON using Google Apps Scripts
- 2. Create a command line tool made by Swift Package Manager that reads the above JSON and uses Stencil to generate a swift file.
- 3. Generate and use the code using the above SPM tool in the application that wants to use the above swift file.
- What you can do with + α
- Wrap up
- Sample code
- Reference
Automatically generate log transmission code from spreadsheet log definition using Stencil
During development, I think that there are cases where you write code and send logs based on the information summarized in a spreadsheet like a log definition document.
However, manually transcribing the code from a spreadsheet can lead to wrong copy-paste, which is annoying!
Therefore, I wanted to automatically generate the swift code based on the spreadsheet data and free myself from the troublesome work of cutting corners, so I tried various trials and errors!
Procedure
Here are the characters this time!
- Google Apps Script(Known as GAS)
- Stencil
- StencilSwiftKit
Google Apps Scripts can be written like JavaScript, a platform that can be used in spreadsheets and so on. This macro in Excel.
Stencil is a template generation tool for Swift. It is also used in SwiftGen and so on.
StencilSwiftKit is a tool like the Stencil extension above. Maintained by the SwiftGen team. The implementation flow is as follows.
- Convert spreadsheet information to JSON using Google Apps Scripts
- Create a command line tool made by Swift Package Manager that reads the above JSON and uses Stencil to generate a swift file.
- Generate and use the code using the above SPM tool in the application that wants to use the above swift file.
1. Convert spreadsheet information to JSON using Google Apps Scripts
First, convert this sheet to JSON as a sample.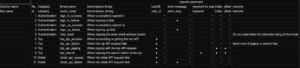
As a preparatory step before that, adds the key values (id and event_name) of each column in json to the 3rd line.
And the process to actually generate JSON from the above spreadsheet is described here.
The processing that is largely described is as follows.
① Processing to convert spreadsheet data to JSON
② Processing to add a JSON output button to the spreadsheet menu
③ Process to display the HTML page that displays the button for JSON download
The procedure of ① depends on how you write the spreadsheet and what kind of JSON you want to output, but by performing this processing, the following JSON will be output.
{
	"eventData": [
		{
			"id": 1,
			"category": "Authentication",
			"event_name": "sign_in_success",
			"transmission_timing": "When successfully signed in",
			"remarks": "",
			"variables": [
				{
					"key": "user_id",
					"shouldShow": false
				},
				{
					"key": "error_msg",
					"shouldShow": false
				},
				{
					"key": "keyword",
					"shouldShow": false
				},
				{
					"key": "index",
					"shouldShow": false
				},
				{
					"key": "offset",
					"shouldShow": false
				}
			]
		}
	]
}
The GAS code itself can be added from the editor that opens by clicking Extensions> Apps Scripts in the menu.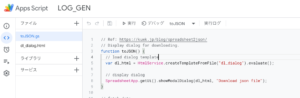
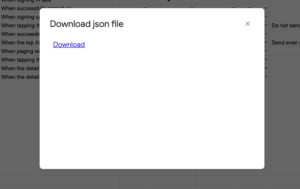
When you run it, you’ll see a JSON button in the spreadsheet menu, and click to proceed to see the JSON download button after processing.![]()
2. Create a command line tool made by Swift Package Manager that reads the above JSON and uses Stencil to generate a swift file.
Next, create a command line tool that converts the JSON generated in 1. to the swift code.
Please refer to here for how to make the command line tool itself using SPM.
What is important this time is a tool called Stencil.
If you create a template file called .stencil and pass JSON data to it, string will be returned, so you can achieve this phase by writing it to the file.
Now let’s check the points. You can see the entire code here.
You can also check the details of the library used this time here.
First, prepare the environment.
Please note that if you use the Environment object when creating it, you will not be able to use the functions of StencilSwiftKit.
let filemanager = FileManager.default
let currentPath = filemanager.currentDirectoryPath
let templateFileFullPath = Path(stringLiteral: currentPath + "/" + ymlEntity.templateFilePathInfo.templateFileDirectory)
var environment = stencilSwiftEnvironment()
// 'templateFileFullPath' sets the directory where the template file is located
environment.loader = FileSystemLoader(paths: [(templateFileFullPath)])
After that, create a temlate object and pass the processed JSON data to the render method.
// set template file name
let template = try environment.loadTemplate(name: fileType.fileName)
// `parameterDictionary` is dictionary converted from JSON file.
let rendered = try template.render(parameterDictionary)
let generatedFilePath = outputDirectory + "/Generated.(fileType.isiOS ? "swift" : "kt")"
// Write 'rendered' string to 'generatedFilePath' file.
try rendered.write(toFile: generatedFilePath, atomically: true, encoding: .utf8)
Now we are ready to pass the JSON to the Stencil template.
The content is just to convert the JSON string to the Codable model, but some variables that JSON does not have are processed from the existing values and defined in swift model file (reference).
The reason is that it is necessary for the processing in the template file described later, or if it is defined in this model, the processing in the template file can be written concisely.
There are three timings to process the data format from the spreadsheet to the final swift file: ①JSON generation, ②LogGen processing, and ③in template file.
Which step to process to produce the final deliverable depends on how you write each spreadsheet and how to process each step, but I’m not very good at GAS, so I was hoping that it would be processed by swift as much as possible.
By the way, this time, data is processed by ①JSON generation and ②LogGen processing.
Finally, let’s check the main template file this time.
You can check the template file created this time here, and the generated file here.
For more information, compare the JSON file with the template file and the generated file.
Below is a part of the template file (ios_log.stencil) created this time.
Here are some expressions that are often used when writing templates.
The excerpted code is the code that describes the parameter struct used to send the log.
Note that the logDictionaries described in the template are the following Dictionary passed to the template, and since the LogModel is the Dictionary, each variable of the LogModel can be used as it is in the template.
let dictionary: [String: Any] = [
  // An array of data in each row of the spreadsheet(LogModel)
  "logDictionaries": logDictionaries,
]
// ①
{% macro logParameterStructParameter logDictionary %}
public struct Log{% filter snakeToCamelCase %}{{ logDictionary.eventName }}{% endfilter %}Parameter: Codable {
{% for variableDictionary in logDictionary.variables where variableDictionary.shouldShow %}
public let {% filter snakeToCamelCase|lowerFirstLetter %}{{ variableDictionary.key }}{% endfilter %}: String
{% endfor %}
public init(
{% for variableDictionary in logDictionary.variables where variableDictionary.shouldShow %}
// ②
{% filter snakeToCamelCase|lowerFirstLetter %}{{ variableDictionary.key }}{% endfilter %}: String{% if not forloop.last %},{% endif %}
{% endfor %}
) {
{% for variableDictionary in logDictionary.variables where variableDictionary.shouldShow %}
self.{% filter snakeToCamelCase|lowerFirstLetter %}{{ variableDictionary.key }}{% endfilter %} = {% filter snakeToCamelCase|lowerFirstLetter %}{{ variableDictionary.key }}{% endfilter %}
{% endfor %}
}
}
{% endmacro %}
// ②
{% for logDictionary in logDictionaries where not logDictionary.isVariablesEmpty %}
{% call logParameterStructParameter logDictionary %}
{% endfor %}Display variables
The output of a variable can be displayed by writing {{variable name}}.
Apply filter
When displaying variables as described above, for example, if you want to display camelCase variables in snake_case, you can change snake_case to camelCase by writing as follows. You can apply multiple filters by separating them with |.
If variableDictionary.key is user_id, UserId (snake_case is camelCase and the first letter is lowercase) is output.
{% filter snakeToCamelCase|lowerFirstLetter %}{{ variableDictionary.key }}{% endfilter %}
StencilSwiftKit has various filters, so if you are interested, please check here.
macro
By enclosing a variable in {% macro {macro name} {parameter}%} {% endmacro%}, the processing during that period can be reused as a macro (①).
When calling, you can call the corresponding macro by writing {% call {macro name} {parameter}%}.
if statement
You can implement an if statement by enclosing it in {% if {Condition}%} {% endif%}.
You can also use else (②).
for statement
As described in ②, you can use the for statement by passing the parameters of the array.
This time, the macro is called with the information of the definition of each log as a parameter.
I use isVariablesEmpty to determine if array-item is necessary to create a struct for the parameter, filter by where, and execute the macro only for the one that generates the parameter.
In addition, this for statement has another convenient function, and it is possible to determine the number of laps of the current loop statement.
In this example, as shown in ③, forloop.last
By using, the process of adding, is added when it is not the last loop.
There are various descriptions of Stencil in the Stencil documentation, so if you look it up, you will find what you want to do.
Also, I think that SwiftGen’s stencil file will be helpful in various ways.
3. Generate and use the code using the above SPM tool in the application that wants to use the above swift file.
Finally, run the command line tool to generate the swift file.
The tool created this time creates a configuration file of yml and passes the path of that file as a parameter when the tool is executed (Current directory by default).
If you want to clone and run this tool, place the configuration file in the root directory and then run swift run to generate the swift file in the specified path.
If you installed via Mint, you can also generate it by running mint run LogGen LogGen after placing the configuration file in the root directory as well.
What you can do with + α
- Add validation processing when generating JSON
- Allow command line tools to be installed with Mint etc.
- Generate a file for Android (reference)
Wrap up
It was hard to prepare, but it was fun to get in touch with the new technology, and I was very happy to be freed from wasted work!
It seems that the Stencil used this time may be used for other than log-related processing, and as an engineer, I think it’s important that reducing non-Creative work as much as possible while touching new technology not only increases productivity but also maintaining high motivation.
Sample code
Reference
- https://kuwk.jp/blog/spreadsheet2json/
- https://buildmedia.readthedocs.org/media/pdf/stencil-template/latest/stencil-template.pdf