2.Send data to Firebase with Raspberry Pi – Run Swift’s CLI tool
This article is a summary of the second part of the session presented at iOSDC2023, the presentation of growing apples with Swift.
This is a sequel to the article “1. Get sensor data – Call Python code from Swift”. If you haven’t read it yet, please read it!
https://ulog.sugiy.com/en/swiftgarden-1-get-sensor-data-by-python/
It is about the implementation of ② to ④ in the following diagram
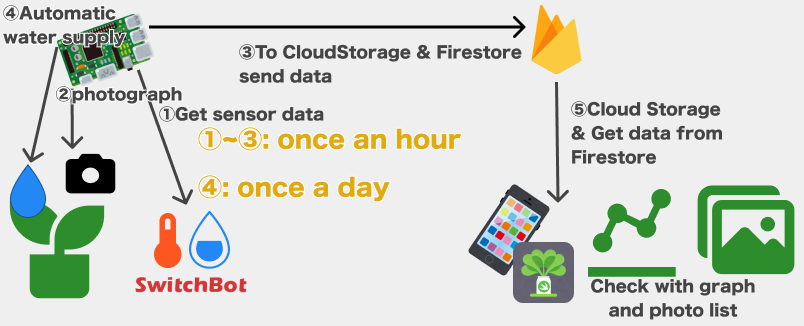
Taking pictures with Raspberry Pi
First, take a photo of ②.
The bullseye version of Raspbian on the Raspberry Pi I am using this time has , there are some commands libcamera-xxx (Reference)
For example, there is a Hello, world-like command called libcamera-hello, and when this is executed, by default, a preview like the one below is displayed for a few seconds. works
This time, we will use libcamera-jpeg from this command
As for usage, like libcamera-jpeg -o test1.jpg, Specify where to save jpeg photos
And now we are ready to call this command from Swift
To invoke the command, we will use Process this time
Set the arguments property of process, including the command to be executed, and separate the options into a separate String as follows:
let process = Process()
process.executableURL = Foundation.URL(fileURLWithPath: "/usr/bin/env")
process.arguments = ["/usr/bin/libcamera-jpeg", "-o", “${FILE_PATH}”]
try process.run()
process.waitUntilExit()
Now you can save the photo to the specified file path from Swift
Implement Firebase execution processing with Swift CLI
Using Firebase RestAPI
Next, save the sensor and photo data acquired so far to Firebase’s Firestore and Cloud Storage, respectively
Normally, we can use the Firebase SDK in the iOS application that we implement, but the SDK cannot be used in the SwiftPackage CLI that we will implement this time.
The familiar GoogleService-Info.plist is required to use the SDK.
Information such as the APIKey of the application and the BundleID of the application are summarized in this file. In a normal iOS application, the SDK reads this file, compares and confirms the BundleID of the application and the BundleID written in the file, I am trying to use it.
When the SDK reads the GoogleService-Info.plist, in the case of Package, the resource file is registered in Package.swift, but at that time To access that file, you have to write it like Bundle.module.xxx instead of Bundle.main.xxx
However, the SDK is described only in the former Bundle.main.xxx format, and even if you try to get the information, you cannot get it due to its specifications, and the application cannot be started normally (reference code 1, reference code 2).
To access Firebase with RestAPI, you need to prepare an AccessToken
The main flow is as follows
- Create a credential for OAuth in Google’s Google API Console and enter the Client ID and Client Secret Get
- Get Authorization Code
- Acquisition of access token (refresh token can also be obtained together)
This time, I used this reference site for reference
When executing each API, The permission scope required for that execution is defined, and it is necessary to set it in the above (2) Acquisition of authorization code.
In this case, the API to be used is (1) Firestore Add New Document, (2) Add New CloudStorage Data However, for example (1) Document states that the following scope is required
- https://www.googleapis.com/auth/datastore
- https://www.googleapis.com/auth/cloud-platform
Therefore, the URL for obtaining the authorization code issued in step 2 above will be in the following format (implemented by cloud-platform)
https://accounts.google.com/o/oauth2/auth?
scope=https%3A%2F%2Fwww.googleapis.com%2Fauth%2Fcloud-platform
&client_id=${CLIENT_ID}
&response_type=code
&redirect_uri=${REDIRECT_URL}
If you run it in your browser you will see a screen that looks familiar like below and after you continue you will get the code
By performing this procedure, you can obtain an AccessToken and a RefreshToken
AccessToken expires in about an hour, and using an expired AccessToken returns a 401 error. Then you need to use RefreshToken to get a new AccessToken
curl  -X POST 'https://accounts.google.com/o/oauth2/token'
  --form 'client_id=${CLIENT_ID}' --form 'client_secret=${CLIENT_SECRET}'
  --form 'grant_type="refresh_token"' --form 'refresh_token=${REFRESH_TOKEN}'
By executing the above process, you can get a new AccessToken like the one below.
{
  "access_token": ${ACCESS_TOKEN},
  "expires_in": 3599,
  "scope": "https://www.googleapis.com/auth/devstorage.full_control https://www.googleapis.com/auth/cloud-platform",
  "token_type": "Bearer"
}
RefreshToken basically seems to have no expiration date (if you don’t use RefreshToken for a while or disable it on the console, you can continue to use it)
Therefore, RefreshToken must be strictly managed
This time, the above process is implemented with Swift code, and when an error of 401 is returned, the AccessToken is updated using RefreshToken and the original process is retried. will
This time, the basic communication processing is implemented using Alamofire
In general, communication processing This is because the URLSesison system used cannot be used in the Linux environment like the iOS environment (exactly FoundationNetworking only needs to be imported)
Even if you import it, async methods cannot be used, so you need to wrap it with withCheckedContinuation etc. Yes (Reference)
Check the repository for code details
Save image files to CloudStorage
Once the AccessToken is ready, save the captured jpeg file to CloudStorage
Parameters and endpoints are documentation
The request looks like this
curl  -X POST
  'https://storage.googleapis.com/upload/storage/v1/b/${BUCKET_NAME}/o?name=${FILE_NAME}&uploadType=media'
  --header 'Accept: */*'
  --header 'Content-Type: image/jpeg'
  --header 'Authorization: Bearer ${ACCESS_TOKEN}'
AccessToken uses the one obtained earlier
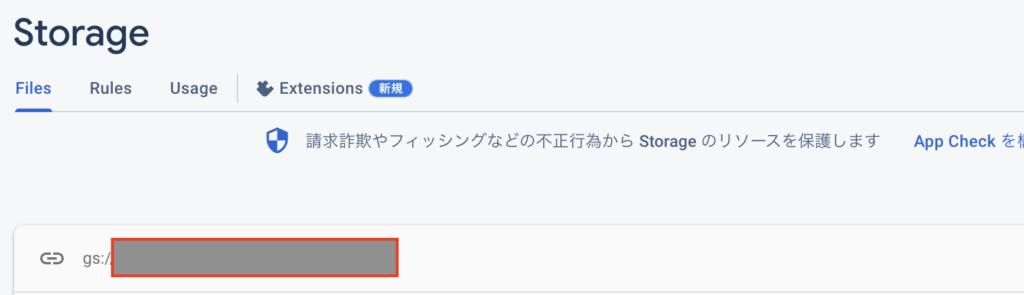
BUCKET_NAME can be found in the following location of CloudStorage
FILE_NAME will save images under the SwiftGardenImages/ folder this time, so the file name will be 20230903110000.jpeg , specify SwiftGardens/20230903110000.jpeg
But there is a problem here
I thought that all I had to do was upload a file with Alamofire etc., but when I implemented it with both Alamofire and URLSession and ran it on a Raspberry Pi, I got the following error.
URLSessionTask failed with error: HTTP/2 stream 0 was not closed cleanly: PROTOCOL_ERROR (err 1)It seems to be caused by HTTP/2.
I don’t know why this kind of error occurs, but URLSession processing is handled by HTTP/2 by default, so I implemented it in this way It seems difficult
When I looked it up, vapor, which was also used in last year’s announcement, is using swift-nio, a package that can implement high-performance communication processing that can be used cross-platform, specifies the version of HTTP. So I decided to use this library.
However, implementation using swift-nio directly is quite difficult, so when I searched for a library that could implement communication processing using it, I found async-http-client.
As a result, when I used this library to implement the image upload process, I succeeded (however, it is a mystery that I succeeded without explicitly setting the HTTP version to 1)
Below is a part of the code implemented by trial and error
static let httpClient = HTTPClient(eventLoopGroupProvider: .createNew)

static func postImageWithAsyncHTTPClient(fileURL: URL) async throws -> CloudStoragePostResponse {
    let fileName = fileURL.lastPathComponent
    let fileData = try Data(contentsOf: fileURL)
    let requestURL = URL(string: URLList.postStorage.URL.absoluteString + "&name=(Constants.imageParentDirectoryName)/(fileName)")!
    var request = HTTPClientRequest(url: requestURL.absoluteString)
    request.method = .POST
    request.headers.add(name: "Authorization", value: "Bearer (accessToken)")
    request.headers.add(name: "Content-Type", value: "image/jpeg") // <---- Point1
    request.body = .bytes(fileData, length: .known(fileURL.fileByteLength)) // <---- Point2
    let response = try await httpClient.execute(request, timeout: .seconds(30))
    try await httpClient.shutdown()
    if response.status == .ok {
        let byteBuffer = try await response.body.collect(upTo: 1024 * 1024) // 1 MB
        let responseData = Data(byteBuffer.readableBytesView)
        let decoder = JSONDecoder()
        return try decoder.decode(CloudStoragePostResponse.self, from: responseData)
    } else {
        throw SwiftGardenError.errorRespoonse(statusCode: Int(response.status.code))
    }
}
The above implementation has two points
- Always specify
image/jpegforContent-Type- If this is not specified, it will not be saved as an image on the CloudStorage side, and you will not be able to preview the image
- Also specify binary size when storing data
- If this is not specified, an error will occur during processing
fileByteLengthis an extended property of your own URL (I usefatalError()because it is a personal development)
var fileByteLength: Int {
    guard let attributes = try? FileManager.default.attributesOfItem(atPath: path),
            let fileSize = attributes[.size] as? Int else { fatalError() }
    return fileSize
}
This completes the process of saving images from the Raspberry Pi to CloudStorage, which was the most difficult task this time.
If this process succeeds, CloudStorage will return the file name and URL of the image.
Save data to Firestore
Next is adding data to Firestore, more precisely adding a new document to the specified collection
Referring to the RestAPI document, you can post with the following code for curl
curl -X POST
  'https://firestore.googleapis.com/v1/projects/$PROJECT_ID/databases/(default)/documents/${COLLECTION_ID}
  --header 'Authorization: Bearer ${ACCESS_TOKEN}'
  --header 'Content-Type: application/json'
  --data-raw '{
    "fields": {
        "hoge": { "stringValue": "abcdefghijk" },
        "date": { "timestampValue": "2023-07-31T13:51:54.107Z" } }
   }'
PROJECT_ID here is basically the same value as BUCKET_NAME above
Set any value for COLLECTION_ID
It’s in the fields that matter
If you want to add a new field, you will need three items: (1) field key, (2) type information (String, interger, timestamp, etc.), and (3) field value.
This time, we will use three types: String (image file name and URL), Double (humidity and temperature obtained from the sensor), and Timestamp (timestamp to record the time when these processes were executed).
In order to implement the above format JSON in Swift’s Encodable, I defined my own encode function as follows
By the way, the value set in Timestamp converts the value of Date() into a string in yyyy-MM-dd’T’HH:mm:ss.SSS’Z’ format.
By doing this, Firestore will automatically detect it as a Timestamp type and save it.
func encode(to encoder: Encoder) throws {
    var container = encoder.container(keyedBy: CodingKeys.self)
    var fieldsContainer = container.nestedContainer(keyedBy: FieldsKeys.self, forKey: .fields)
    try fieldsContainer.encode(["stringValue": imageName], forKey: .imageName)
    try fieldsContainer.encode(["stringValue": imageURL], forKey: .imageURL)
    try fieldsContainer.encode(["timestampValue": timestamp], forKey: .timestamp)
    try fieldsContainer.encode(["doubleValue": temperature], forKey: .temperature)
    try fieldsContainer.encode(["integerValue": humidity], forKey: .humidity)
}
Considering this, the SDK that I always use in iOS is doing this process behind the scenes, so I feel grateful for that.
If you use this Endable model to implement communication processing, you can save data to Firestore as expected without using SDK code.
Wrap up
In this article, we summarized the content of saving data to Firebase with the CLI of the second part of the SwiftGarden announcement
The next article is “3. Automatic Water Supply – Operate Raspberry Pi’s GPIO with Swift”!
Reference
- OAuth 2.0 を使用してGoogle API にアクセスする方法
- Cloud Storage Objects: insert
- Firestore Method: projects.databases.documents.createDocument
- 【Swift】Vapor で URLSession を使用したいときの注意点