3. Perform automatic water supply – Operate Raspberry Pi GPIO with Swift
This article summarizes the contents of Part 3 of the session presented at iOSDC2023, the presentation of growing apples with Swift.
This is a sequel to the article “2. Send data to Firebase with Raspberry Pi – Run Swift’s CLI tool”. If you haven’t read it yet, please read it!

This time, we will summarize how to implement the water supply of ④ and how to schedule the processing of ① to ④.
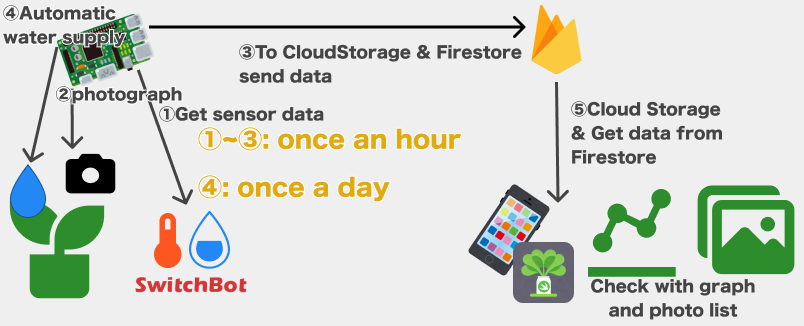
Enable automatic watering of plants in the home garden
We aim to create a mechanism that can control water supply using Raspberry Pi and a pump.
This time, I proceeded with the implementation with reference to this article
The pump I’m using runs on a 12v power supply here, and the relay is here!
The first time I ran the pump, I was using a non-12v power supply and it didn’t work, so make sure you have a 12v power supply!
This time, we will use Raspberry Pi’s GPIO to control this pump.
Regarding the original RaspberryPi and GPIO, there is an explanation in last year’s announcement article, so please check that for details.


This time the wiring is as follows

By the way, the relay module is as follows
What is a relay module?
Electronic components that act as switches in electrical circuits and electronic devices to control high-current and high-voltage circuits with low-current and low-voltage signals
In this implementation, from the GPIO21 pin, we will be able to operate the switch of the relay and turn on/off the flow of 12v electricity.
Implement with SwiftyGPIO
The relay switching implementation above will be done using SwiftyGPIO, which was also used last year
SwiftyGPIO The code works only in Linux environment, so I assume it works only in Linux
import SwiftyGPIO

final class GPIOManager {
    static let shared = GPIOManager()
    private let waterDrainGPIO: GPIO

    init() {
        let gpios = SwiftyGPIO.GPIOs(for: .RaspberryPi4)
        waterDrainGPIO = gpios[.P21]! // ①
        waterDrainGPIO.direction = .OUT // ②
    }

    func drainWater() async {
        waterDrainGPIO.value = 1
        print("Started draining water")
        // Can't use UInt64 because raspberry-pi is 32bit
        try! await Task.sleep(nanoseconds: 5 * 1_000_000_000)
        waterDrainGPIO.value = 0
        print("Stopped draining water")
    }
}
Since we will be operating the 21 pin this time, we will prepare an instance for the 21 pin (①)
Also, since the current will flow this time, direction is set to .OUT
Next is the implementation of the drainWater function
As for the water supply behavior, set the value property of the GPIO pin instance to 1. If you set it to 0, the water supply will stop.
This time, we want to supply water for only 5 seconds, so I implemented process like Start water supply → sleep for 5 seconds → water supply.
The trap this time was that the Raspberry Pi OS was 32-bit, so if you pass an explicit UInt64 to Task.sleep(nanoseconds:) Since it throws an error, the subsequent water supply stop processing is not executed.
At first, I implemented this sleep time as follows, but then an error was thrown, so Implemented
func drainWater(second: Int) async {
    waterDrainGPIO.value = 1
    print("Started draining water")
    // Can't use UInt64 because raspberry-pi is 32bit
    try! await Task.sleep(nanoseconds: UInt64(second * 1_000_000_000))
    waterDrainGPIO.value = 0
    print("Stopped draining water")
}
When you do this, water will come out of the pump like this!
The water pressure of the pump was higher than I expected, so the water supply method needs to be improved!

Enable scheduled script execution
Next, we will make it possible to schedule the processes we have implemented so far
This time, we will be able to execute processes ① to ③ once an hour and process ④ once a day
To prepare for that, do the following
- Each of the above processes can be called with command options
- Scheduling with
systemd
Prepare command options
This time, run the following command to make it work
- SwiftGardenPi –captureData
- SwiftGardenPi –drainWater
You can get the options when running in terminal in CommandLine.arguments in the form of an array of String
so you can convert the options to an enum
enum CommandKind {
case captureData
case drainWater
case switchLight(isON: Bool)
static func converted(from arguments: [String]) -> CommandKind {
print(arguments)
if arguments.isEmpty {
fatalError("Parameter is required!")
} else if arguments.count == 3 {
switch arguments {
case "--switchLight":
switch arguments
{
case "--switchLight":
switch arguments {
case "isOn":
return .switchLight(isON: true)
case "isOff":
return .switchLight(isON: false)
default:
fatalError("Invalid parameter")
}
default:
fatalError("Invalid parameter")
}
} else if arguments.count == 2 {
switch arguments {
case "--captureData":
return .captureData
case "--drainWater":
return .drainWater
default:
fatalError("Invalid parameter")
}
} else {
fatalError("Parameter is required!")
}
}
}
{
case "isOn":
return .switchLight(isON: true)
case "isOff":
return .switchLight(isON: false)
default:
fatalError("Invalid parameter")
}
default:
fatalError("Invalid parameter")
}
} else if arguments.count == 2 {
switch arguments {
case "--captureData":
return .captureData
case "--drainWater":
return .drainWater
default:
fatalError("Invalid parameter")
}
} else {
fatalError("Parameter is required!")
}
}
}After that, switch this enum and call the functions to be executed respectively.
Scheduling with systemd
For those who don’t know what systemd is in the first place (because the author didn’t know either), I asked ChatGPT
What is systemd?
systemd is the system and session manager that runs as the Linux system initialization process and is responsible for booting the system and managing services. Many major Linux distributions in recent years have adopted it instead of the traditional initialization systems such as SysVinit and Upstart.
Some of the main features and functions of systemd include:
- Concurrency: systemd speeds up system boot time by starting services in parallel.
- Service Dependencies: By defining dependencies between services, the required services will start automatically when they are available.
- System State Management: You can use the
systemctlcommand to start, stop, restart, check the status of services, and more. - Log Management: Centrally manage system logs using a component called
journald. - Cgroup integration: You can control and monitor resource usage (CPU, memory, disk IO, etc.).
- Timer: Like Cron, you can schedule scheduled job executions.
- Socket-Based Activation: Services can only be activated on demand, saving resources.
With these features, systemd improves the efficiency of booting and operating Linux systems, while also providing ease of administration. However, there are pros and cons about its design concept and unique method.
By using this, you can do things like run a specified script at a specified time
This timeI referred to the article here
For example, in the case of water supply processing, I made the following settings
I also want to output a file for the log in the script to be executed. , prepare another file
#!/bin/bash

current_date=$(date +"%Y%m%d%H%M%S")
output_file="/home/${HOME_DIRECTORY_NAME}/result/Result/DrainWater/output_drain_water_${current_date}.txt"
SwiftGardenPi --drainWater >> $output_file
Next, prepare a service file (1) and a timer file (2)
# 1
sudo nano /etc/systemd/system/drain_water.service
# 2
sudo nano /etc/systemd/system/drain_water.timer
The service file looks like this
[Unit]
Description=Drain water automatically(This is comment)
After=network.target

[Service]
ExecStart=/path/to/your/drain_water.sh
WorkingDirectory=/home/${HOME_DIRECTORY_NAME}/${APP_DIRECTORY}
Describe the path of the script file to be executed in ExecStart
Description is an easy-to-understand comment
[Unit]
Description=Drain water every 9 A.M.
After=network.target

[Timer]
OnCalendar=*-*-* 09:00:00

[Install]
WantedBy=timers.target
In the timer file, specify when to run in OnCalendar
How to write details here
Now run the following command and reboot your Raspberry Pi!
sudo systemctl enable drain_water.timerAt the specified time, the specified process will be executed, and the log will be saved in the log file after execution
What remains in the log is what was print in swift. and so on
This completes the implementation on the Raspberry Pi side!
Summary
In this article, we have summarized the contents of the three parts of the SwiftGarden announcement of automatic water supply
The next article is “4. Checking data in the iOS app – Implementing Swift Charts”!