Check how to implement StoreKit2
What is StoreKit2 ?
WWDC is here again this year! This year as well as last year, it will be held online, and I am very grateful that the video of the session can be easily viewed from the app or the Web.
This time there was a big update related to StoreKit, and it was announced as StoreKit2.
There are several StoreKit related videos, and we recommend watching them in order below.
1. Meet StoreKit 2

2. Manage in-app purchases on your server

3. Support customers and handle refunds

The following is a rough summary of the contents.
- Can now be written easily and shortly using Swift concurrency(async/await)
- You can now manage and refund subscriptions</ span> within the app
- You can also get past transaction history</ span> and purchased billing item status</ span>
This time, I will mainly summarize the contents of “1. Meet StoreKit 2“.
Check the processing of the Store.swift file that mainly describes the billing process of StoreKit2 in the sample application of StoreKit2 touched by Xcode13 beta.
- Mac: Monterey v12.0(21A5248p)
- Xcode: 13 beta(13A5154h)
Check the description method in StoreKit2
Let’s check the actual description here.
By the way, for those who are not familiar with the implementation method and flow of In-App-Purchase itself, the billing process is roughly as follows.
① Acquire information on billing items (consumption type (billing items, etc.), non-consumption type (purchased items such as advertisement non-display), automatic renewal type (so-called subscription), etc.)
② Manage billing processing in units called transaction for billing processing
②-1 Start transaction
②-2 After successful purchase processing on the App Store side, if receipt verification (billing) is required, it will be processed, generally on the server.
②-3 End the transaction
More details can be found in the articles of the great ancestors.

If you want to implement this with StoreKit so far, you have to understand the roles and usage of many characters such as SKProduct SKPayment, SKPaymentQueue, SKPaymentTransaction, SKProductsRequest.
However, in StoreKit 2, the characters around here have also been significantly redesigned.
① Product: Billing item struct (formerly SKProduct)② Transaction: struct that manages transactions (formerly SKPaymentTransaction)
The name has become simpler and there are fewer terms.
Next, let’s check how to write the code.
I will quote the code of the sample app that was also used in the WWDC video.
The details of async / await will be omitted.
How to get billing items
Check how to get the billing item.
let storeProducts = try await Product.request(with: Set(productIdToEmoji.keys))I wrote a lot of processing using SKProductRequest etc. so far, but the acquisition of items can be acquired in one line just by passing the Set of the ID of the billing item.
The result can be obtained as an array of Product.
After this, you can use the Product‘s type property to sort out consumables, non-consumables, subscriptions, and so on.
In the sample code, it is written as follows.
for product in storeProducts {
  switch product.type {
  case .consumable:
    newFuel.append(product)
  case .nonConsumable:
    newCars.append(product)
  case .autoRenewable:
    newSubscriptions.append(product)
  default:
     //Ignore this product.
      print("Unknown product")
  }
}
Purchase process for billing items
let result = try await product.purchase()The purchase process itself can also be written in one line.
So far, I had to use SKPaymentTransactionObserver etc. to implement it quite confusingly, but it has become much simpler.
This Result will be an enum called VerificationResult.
It will be signed by AppStore, and validated by StoreKit, and if it’s okay, it will return .verified, and if it fails for any reason, it will return .unverified.
In the sample application, this enum is checkedVerified to get the Transaction.
func checkVerified<T>(_ result: VerificationResult<T>) throws -> T
   //Check if the transaction passes StoreKit verification.
    switch result {

  case .unverified:
        //StoreKit has parsed the JWS but failed verification. Don't deliver content to the user.
        throw StoreError.failedVerification
    case .verified(let safe):
        //If the transaction is verified, unwrap and return it.
        return safe
    }
}
When the purchase process is completed properly, exit Transaction.
await transaction.finish()Transaction monitoring
If the above billing process does not end immediately, you may want to be notified that the Transaction status has changed.
In the WWDC session, the case where parental permission is required at the time of billing is introduced as an example, in which case (1) Start billing process → (2) Parent approves the billing on the parent’s terminal → (3)actually execute billing process, so this monitoring process is necessary.
In the sample app, it is written as follows.
func listenForTransactions() -> Task.Handle<Void, Error> {
    return detach {
        //Iterate through any transactions which didn't come from a direct call to `purchase()`.
        for await result in Transaction.listener {
          do {
                let transaction = try self.checkVerified(result)
                //Deliver content to the user.
                await self.updatePurchasedIdentifiers(transaction)
                //Always finish a transaction.
                await transaction.finish()
            } catch {
                //StoreKit has a receipt it can read but it failed verification. Don't deliver content to the user.
                print("Transaction failed verification")
             }
       }
    }
}
In the case of the above example, after ② Parent approves the charge on the parent’s terminal, the process in the above listener is called.
The processing in it is the same as the processing at the time of purchase described above.
Note that Task, detach, etc. written here are new expressions that can be used from iOS 15 related to async / await, and I will omit the explanation here (I have not understood it yet, so I will catch up from now on)
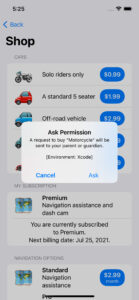
By the way, “② Parent approves the charge on the parent’s terminal” can also be simulated by operating on Xcode.
Open the Product.storekit file in the sample app and select “Editor”-> “Enable Ask to Buy” from the top menu.
If you then purchase a billing item, you’ll see a capture-like alert, select Ask.
After that, you can check the transaction history by clicking the red circle below in Xcode.
After that, you can check the transaction history by clicking the red circle below in Xcode.
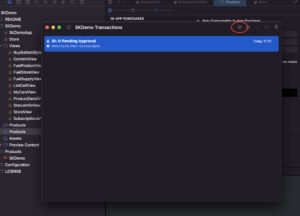
This screen is convenient, and if you delete Transaction here, it will be reflected on the application side, so it is a very useful Debug tool when verifying.
Check the purchase status of billing items
Next, we will describe the implementation to check the purchase status of billing items.
In the sample app, we are creating a function to check if the app has been charged.
func isPurchased(_ productIdentifier: String) async throws -> Bool {
   //Get the most recent transaction receipt for this `productIdentifier`.
    guard let result = await Transaction.latest(for: productIdentifier) else {
        //If there is no latest transaction, the product has not been purchased.
        return false
    }
    let transaction = try checkVerified(result)
    //Ignore revoked transactions, they're no longer purchased.
    //For subscriptions, a user can upgrade in the middle of their subscription period. The lower service
    //tier will then have the `isUpgraded` flag set and there will be a new transaction for the higher service
    //tier. Ignore the lower service tier transactions which have been upgraded.
    return transaction.revocationDate == nil && !transaction.isUpgraded
}
First, get the latest Transaction for the charged item with Transaction.latest (for: {charged item ID}). If it does not become nil, it means that user have already purchased it.
For the last transaction.revocationDate == nil &&! Transaction.isUpgraded, the revocationDate is nil, which means that we are checking the billing item has not expired because of refund etc. and has not been upgraded to a higher item in the case of a subscription using isUpgraded (because we want to consider the highest-ranked item I have purchased as purchased item).
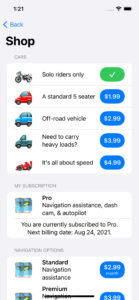
In the demo app of this sample app, this function is used to display a check mark ✔️ if purchased.
Check the status of your subscription
Finally, let’s see how to get the status of your subscription.
Specifically, you can get which items the user subscribes to in the subscription group (3 types of items, Standard, Premium, and Pro are registered as the same group in the sample app).
guard let product = store.subscriptions.first,
  let statuses = try await product.subscription?.status else {
    return
}
You can get the status of the subscription group above.
Because you get the status of a group, you can get the status from any subscription item that belongs to that group.
In the sample app, we are getting the first item in the subscription item in the store.
You can get the status in the Product.Subscription.Status array.
It seems that the reason for the array is that in addition to its own status, it may get other statuses such as family share (I do not understand well here).
for status in statuses {
  switch status.state {
  case .expired, .revoked:
    continue
  default:
    let renewalInfo = try store.checkVerified(status.renewalInfo)

    guard let newSubscription = store.subscriptions.first(where: { $0.id == renewalInfo.currentProductID }) else {
      continue
    }

    guard let currentProduct = highestProduct else {
      highestStatus = status
      highestProduct = newSubscription
      continue
     }

    let highestTier = store.tier(for: currentProduct.id)
    let newTier = store.tier(for: renewalInfo.currentProductID)

    if newTier > highestTier {
      highestStatus = status
      highestProduct = newSubscription
    }
  }
}

status = highestStatus
currentSubscription = highestProduct
For items that are valid subscriptions and are higher grade than the subscription that are currently subscribed to (grade is referred to as Tier in this app), this app have implemented a process to update the display. ..
For renewalInfo, you can get information such as Product ID, reason for expiration, and whether it is automatically updated in the specified month with a struct called Product.Subscription.RenewalInfo.
Wrapping up
This time, we have summarized the newly announced StoreKit2 at WWDC 2021.
Since I joined the current company, I started to touch the processing around billing, and I felt that it was very difficult to understand, but this StoreKit2 writing method requires catch-up of async / await, but I think readability and ease of implementation has been improved significantly.
Also, there are more things you can do in the app about subscriptions. As a developer, it is limited to iOS 15 and above, but I think that it will be much more convenient if it becomes easier to implement the subscription function and if the user can manage the subscription within the app.
There seems to be a lot more things that can be done other than what is described here, so I thought it would be interesting to investigate it little by little and try implementing it myself.
Since one implementation example is written in the sample application, I feel that it can be implemented quickly if you refer to it.
In addition, async / await, which is widely used in StoreKit2 this time, is a notation that is likely to be used in various situations in the future, so I would like to catch up with that in the future.
References
- Meet StoreKit 2(https://developer.apple.com/videos/play/wwdc2021/10192/)
- iOSアプリ内でそれぞれのサブスクの管理や返金が可能に、アップルがStoreKit 2を発表(https://jp.techcrunch.com/2021/06/11/2021-06-10-apples-storekit-2-simplifies-app-store-subscriptions-and-refunds-by-making-them-accessible-inside-apps/)