Move Vapor – Communicate between iPhone and Raspberry Pi with Vapor 1
This article is based on the session presented at iOSDC2022, Make your home more convenient and safe with Swift! This is the first article that summarizes the contents of Part 2 of the announcement.
This article is a continuation of 1. Running Swift on Raspberry Pi – Using GPIO to blink an LED. If you haven’t read it yet, please do so!
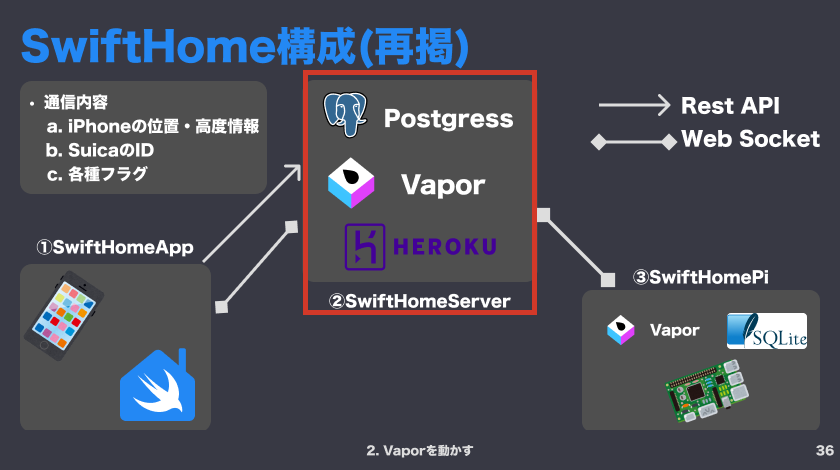
This part introduces the implementation of SwiftHomeServer .
What is Vapor?
- One of the ServerSideSwift frameworks
- By writing the front and server side in Swift, Codable’s response and It has the advantage of being able to share code such as models
- By using the same model in the app and the server, parse errors do not occur!
- Easy to use DB and WebSocket
- At time of writing, available on Mac and Linux
- Extensive documentation so it’s easy to start development!
- Ref: https://vapor.codes
Implement Vapor
Flow of implementing SwiftHomeServer
- Create a Vapor project called SwiftHomeServer on a Mac
- Implement API, WebSocket, etc. → Operation check
- SwiftHomeServer on Heroku
- Connect to SwiftHomeServer from SwiftHomeApp, SwiftHomePi
Development environment
- MacBook Pro (14-inch, 2021, Apple M1 Pro)
- macOS
- Monterey 12.2.1
- Xcode 13.4.1
- Vapor4 (latest version at time of writing)
- toolbox: 18.5.1
- CLI tools for Vapor
Install Vapor
Let’s install it first!
This time, we will install it on Mac and create a template project.
$ brew install vapor
$ vapor --help
$ vapor new SwiftHomeServer
# ① Select using Fluent or not. (ORM framework for Swift.)
> Would you like to use Fluent? (--fluent/--no-fluent) #→ y
# ②Select database(If using in Heroku, ‘Postgres’ is required.)
> Which database would you like to use? (--fluent.db) #→ y
# ③Select using Leaf or not.(a powerful templating language with Swift-inspired syntax.)
> Would you like to use Leaf? (--leaf/--no-leaf) #→ y or n(this time, n)
Installation on Mac can be done with brew.
You can create a template project with vapor new ${ProjectName}.
After running, you will be asked for some options.
First, you will be asked if you want to use Fluent, a library that makes it easier to implement databases in Vapor.
If you select yes here, you will be asked which database to use.
This time we are going to deploy to Heroku, so select Postgres which can be used with Heroku.
Finally, Leaf is a Swift-based tool that can generate dynamic HTML.
We won’t use it this time, so here is no
Checking the operation of the template project
$ cd SwiftHomeServer
$ swift run
Once the build is successful, run http://localhost:8080/hello in your browser.
If it prints Hello, world!, you’re good to go! 🎉 (Reference)
By the way, the routing process is written as follows.
// (Omit)
func routes(_ app: Application) throws {
    app.get { req async in // ①Called if no endpoint specified
        "It works!"
    }
    // ②can use async/await
    app.get("hello") { req async -> String in // ③Specify the endpoint and method type here
        "Hello, world!"
    }
// (Omit)
① is the Get API that is called when no endpoint is specified, and ③ is the Get API that is called when /hello is specified.
As confirmed above, it is implemented to return Hello, world!
Implement Post API of SwiftHomeServer
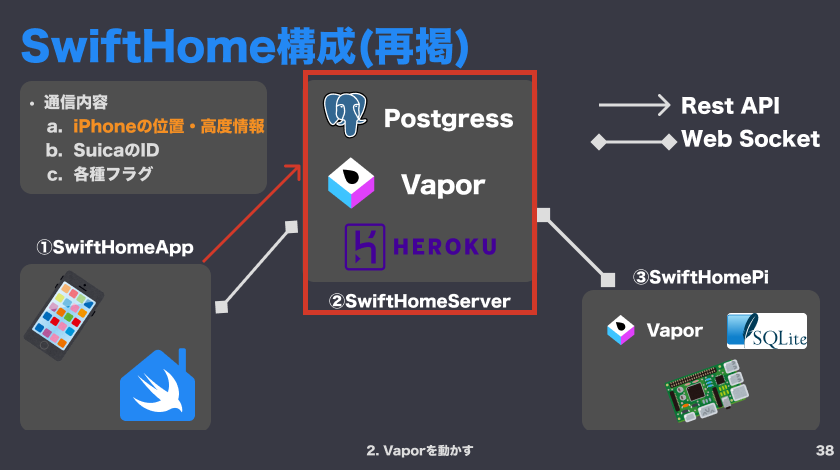
Next, implement the SwiftHomeServer Post API.
This time, we will implement an API to post iPhone location and altitude information from SwiftHomeApp.
Add API definition to routes.swift
First, add the API definition to routes.swift in the template you checked earlier.
This time, we will also implement an additional implementation that applies basic authentication settings, so let’s check that first.
Since the basic authentication struct implemented here is also used outside of SwiftHomeServer, SwiftHomeServerCore is defined as a common code in a public Package.
First, implement User struct and AsyncBasicAuthenticator struct with Authenticatable protocol applied.
Here, we are checking if the username and password set when executing the API match those set in advance.
As usual, basic authentication information refers to SwiftHomeCredentials.
import Vapor
import SwiftHomeCredentials

// Ref: https://docs.vapor.codes/security/authentication/
public struct User: Authenticatable {
    public let name: String
}

public struct UserAuthenticator: {
    public init() {}

    public func authenticate(
        basic: BasicAuthorization,
        for request: Request
    ) async throws {
        let userCredential = SwiftHomeCredentials.basicAuthentication // defined in SwiftHomeCredentials
        if basic.username == userCredential.id && basic.password == userCredential.password {
            request.auth.login(User(name: (username_defined)))
        }
   }
}
Once you have the above implementation, use these structs and first declare them protected and replace the app written in the template with this Use protected.
This completes the basic authentication settings! So easy! !
EndPointKind.deviceInfo.endPoint specified in the endpoint is an enum that summarizes the endpoint information defined in SwiftHomeCredentials.
When setting with a String variable, you need to add .constant().
Next, let’s see what happens after the data is posted!
First, decode the content of body of the request in req.content. content has a method called decode, so it decodes with the specified type.
This time, it is defined in SwiftHomeCore Since you are using a model and you are using a common model on the sending side as well, you should not get parse errors.
After that, the custom-implemented asDBModel extension method executes a method that converts to a class that facilitates DB processing.
Use that class to perform DB update processing (described later).
Next, in ③, convert it to json for WebSocket transmission, and in ④, send it with WebSocket (details will be described later).
And if no error occurs, return .ok in ⑤.
// protected is an implementation that applies Basic authentication
let protected = app.grouped(UserAuthenticator())
// ①Post API can be implemented by setting post
protected.post(.constant(EndPointKind.deviceInfo.endPoint)) { req async throws -> HTTPResponseStatus in
    let response = try req.content.decode(DeviceInfoModel.self).asDBModel // ②Convert to model for DB
// (Omit: Process of storing data in Postgres)
    let jsonString = try response.asJsonString() // ③asJsonString converts Encodable to json
    try await deviceInfoWebSocket?.send(jsonString) // ④Send data to Raspberry Pi (details will be described later)
    return .ok // ⑤Returns ok if no Error is thrown
}
Implement DB update process
Next, check the DB update process omitted above.
First, implement the class used in the DB update process.
I will write the code first.
import Fluent
import Vapor

public enum DeviceInfoModelFields: FieldKey {
    case deviceId
    case deviceLatitude
    case deviceLongitude
    case absoluteAltimeter
}

public final class DeviceInfoDBModel: Model, Content {

    public static let schema = "DeviceInfo"

    @ID(key: .id)
    public var id: UUID?

    @Field(key: DeviceInfoModelFields.deviceId.rawValue)
    public var deviceId: String
    @Field(key: DeviceInfoModelFields.deviceLatitude.rawValue)
    public var deviceLatitude: Double
    @Field(key: DeviceInfoModelFields.deviceLongitude.rawValue)
    public var deviceLongitude: Double
    @Field(key: DeviceInfoModelFields.absoluteAltimeter.rawValue)
    public var absoluteAltimeter: Double

    public init() {}

    public init(deviceId: String, deviceLatitude: Double, deviceLongitude: Double, absoluteAltimeter: Double) {
        self.id = UUID()
        self.deviceId = deviceId
        self.deviceLatitude = deviceLatitude
        self.deviceLongitude = deviceLongitude
        self.absoluteAltimeter = absoluteAltimeter
    }

    public func update(model: DeviceInfoDBModel) {
        deviceId = model.deviceId
        deviceLatitude = model.deviceLatitude
        deviceLongitude = model.deviceLongitude
        absoluteAltimeter = model.absoluteAltimeter
    }
}
This implementation is also documented in the Fluent/Model section of the Vapor documentation, but at first create a class that inherits Model and Content.
And static schema and @ID< to use as primary key /span> and a variable with @Field attribute.
The string specified in @Field is commonly used in other places, so define an enum called DeviceInfoModelFields and use that value. I’m trying
There is also an update method, passing DeviceInfoDBModel, so that the values of this class can be updated all at once.
When the class for DB is ready, let’s define the class for ①migration and ②DB update.
The code is listed on GitHub (①CreateDeviceInfo, ②DeviceInfoController)
① is configure.swift, ② is routes.swift , the processing to set each is added.
The implementation around here is based on template-generated sample code.
app.migrations.add(CreateDeviceInfo())try app.register(collection: DeviceInfoController())Next, let’s write the actual update process.
Here, if there is already saved data, it will be updated, and if the data is not saved yet, the implementation will add new data.
// ①If saved, update the data; if not saved, create new
if let deviceInfoModel = try await DeviceInfoDBModel.query(on: req.db) // ②Extract data from DB
    .filter(.$deviceId == response.deviceId).all().first { // ③Extract all data matching deviceId
    deviceInfoModel.update(model: response)
    try await deviceInfoModel.save(on: req.db) // ④Save updated data
} else {
    try await response.create(on: req.db) // ⑤Save new data
}
By executing the query method in the Model protocol, you can retrieve the information defined in that class from the DB.
In ②, the acquired data is narrowed down with filter to match deviceId, and the first data in it is acquired (at the time of writing , the method for first(where: {}) was not defined).
If there is data, update the data in the class and call the save method.
If there is no data, call the create method.
This completes the data update process! !
Implement WebSocket
See how to implement WebSockets using Vapor
First, let’s use Vapor to see how to implement WebSockets.
It must be implemented separately on the server side and the client side.
The server side is defined using app.webSocket(Endpoint) in routes.swift, just like the API so far.
The client side can execute WebSocket.connect(to: URL) to process the connection.
When each connection is made, the inside of the closure is called and the webSocket instance (ws) can be obtained, so keep that instance.
// ①Server-side in routes.swift
app.webSocket("echo") { req, ws in // ②Get, Post同様にWebSocketのメソッドを設定する
    // Connected WebSocket.
    echoWebSocket = ws // ③Keep webSocket instance
}
// ④Client-side
WebSocket.connect(to: "ws://echo.websocket.org", on: eventLoop) { ws in
    // Connected WebSocket.
    echoWebSocket = ws // ⑤Keep webSocket instance
}
To send data, use the send method.
You can send strings and arrays of numbers.
var echoWebSocket : WebSocket?
// (Omit)

// ①when sending text
echoWebSocket?.send("Hello, world")

// ②when sending integer([UInt8])
echoWebSocket?.send([1, 2, 3])
When receiving data, use onText/onBinary.
// ①when receiving text
echoWebSocket?.onText { ws, text in
    print(text)
}
// ②when receiving integer([UInt8])
echoWebSocket?.onBinary { ws, binary in
    print(binary)
}
To close the WebSocket, call the close method.
echoWebSocket?.close()This completes the confirmation of the implementation method!
Thank you so much! !
As you can see, the official documentation details how to implement it!
Implement WebSocket for SwiftHomeServer
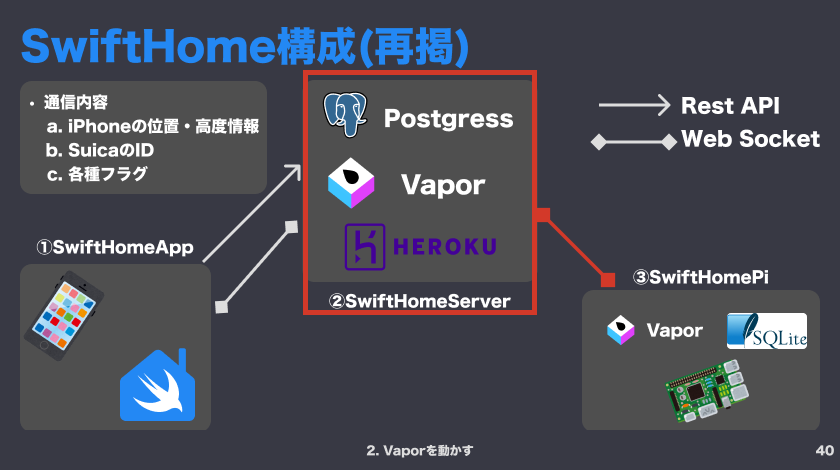
Next, SwiftHomeServer and SwiftHomePi implement WebSockets to exchange location and altitude information.
Let’s start with the server-side definition.
The difference from the previous sample is that basic authentication is set.
The setting method is the same as the Post API (easy to understand, thank you!)
var deviceInfoWebSocket: WebSocket?
// (Omit)
protected.webSocket(.constant(EndPointKind.deviceInfo.webSocketEndPoint)) { _, ws in
    deviceInfoWebSocket = ws // ①Keep webSocket instance
    ws.onText { ws, text in
        print(text)
    }
}
// (Omit)
try await deviceInfoWebSocket?.send(jsonString) // ②Send post data using WebSocket
Next is the implementation of the connection process from the Raspberry Pi.
Here, we also implement an implementation that sets the header for Basic authentication.
In ①, get basic authentication information from SwiftHomeCredentials.
In ②, convert the id/password information to Data type with utf8, and in ③, convert it to base64.
In ④, use Vapor.HTTPHeaders to set the header.
Then set this headers to the argument of the connect method introduced earlier, and you’re done! ! 🎉
private var deviceInfoWebSocket: WebSocket?
// ①ID/Password is defined in SwiftHomeCredentials
let basicAuthentication = SwiftHomeCredentials.basicAuthentication
// ②Convert ID/Password data to data type with utf8
let plainString = "(basicAuthentication.id):(basicAuthentication.password)".data(using: .utf8)
// ③convert to base64
let credential = plainString?.base64EncodedString(options: [])
// ④set base64 in header
let headers: Vapor.HTTPHeaders = [
    "Authorization": "Basic (credential!)"
]
// (Omit) // ⑤serverConfigはLocalhostとHerokuの接続を切り替えやすくする処理
_ = WebSocket.connect(to: "(serverConfig.URLString(type: .webSocket))/(EndPointKind.deviceInfo.webSocketEndPoint)", headers: headers, on: eventLoopGroup) { [weak self] ws in
    guard let self = self else { return }
    // ⑥Retain the WebSocket instance after connecting
    self.deviceInfoWebSocket = ws
    // (Omit: DB update process)
}
Next article
The article has become long, so I will write the continuation below!