
1. Run Swift on Raspberry Pi – Use GPIO to blink an LED
This article is based on the session presented at iOSDC2022, Make your home more convenient and safe with Swift! This article summarizes the contents of the first part of the announcement.
This is a sequel to the article 0. If you haven’t read it yet, please read it!

What is L blinking?
The LED blinking is like Hello world! in programming!
In this announcement, as the first step to run Swift on the Raspberry Pi, we will first implement the LED blinking.
This time, we will use a library called SwiftyGPIO to operate the Raspberry Pi’s GPIO with Swift.
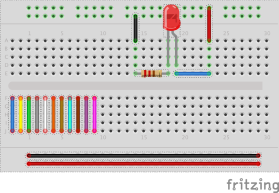
This time, in order to make the LED flash, I will make the following circuit!
- Raspberry Pi GPIO16 pin (plus) -> LED plus (long side)
- LED minus (short side) -> resistor
- resistor – > GPIO GND (negative) pin of Raspberry Pi
I made a circuit to connect things upper!
What is a breadboard?
- A base for easily making electronic circuits without soldering
- Components such as LEDs can be placed
- The following holes are connected inside
- One vertical row separated by a groove
- One horizontal row between the top and bottom
Development on Raspberry Pi
Development environment
$ cat /proc/device-tree/model # Raspberry Pi device information
> Raspberry Pi 4 Model B Rev 1.2

$ cat /etc/os-release # OS information in Raspberry Pi
> PRETTY_NAME="Ubuntu 22.04 LTS"
> NAME="Ubuntu"
> VERSION_ID="22.04"
> VERSION="22.04 (Jammy Jellyfish)"
> VERSION_CODENAME=jammy

$ swift --version
> Swift version 5.6.1 (swift-5.6.1-RELEASE)
> Target: aarch64-unknown-linux-gnu
This time, I am using Raspberry Pi 4, OS is Ubuntu, swift is v5.6.1.
The reason why I installed the Ubuntu OS on the Raspberry Pi is that I am assuming that I will use Vapor this time, but the standard Raspberry Pi OS did not pass the Vapor settings and builds.
There were many examples of using Ubuntu for the same reason on the site I referred to.
Also, at the time of writing, Swift5.6 can be used on Ubuntu, but with the Raspberry Pi OS, only Swift5.1.5 can be used.
So I decided to proceed to use Ubuntu considering ease of development.
Install Swift on Raspberry Pi
To install Swift on your Raspberry Pi, run the following command and you should be good to go!
# Setup
# Step1 - Update system app
$ sudo apt update && sudo apt upgrade
# Install curl
$ sudo apt install curl
# Step2 - Run the quick install script
$ curl -s https://archive.swiftlang.xyz/install.sh | sudo bash
# Step3 - Choose which version of Swift to install
# Choose swift version
# Step4 - Install Swift
$ sudo apt install swiftlang
$ swift --version
# Ref: https://swift-arm.com/installSwift/
Create a sample project
This time, I created a package called SwiftHomeLED.
$ mkdir SwiftHomeLED
$ cd SwiftHomeLED
$ swift package init --name SwiftHomeLED --type executable
Next, set SwiftyGPIO dependencies in Package.swift
// (Omit)
    name: "SwiftHomeLED",
    dependencies: [
        .package(url: "https://github.com/uraimo/SwiftyGPIO.git", from: "1.0.0"),
    ],
    targets: [

// (Omit)
            dependencies: ["SwiftyGPIO"]),
Finally, implement the process to blink the LED every 0.2 seconds in main.swift.
import Foundation
import SwiftyGPIO
let gpios = SwiftyGPIO.GPIOs(for: .RaspberryPi4) // ①instance for raspberry pi4
let ledGpio = gpios[.P16]! // ②instance to control GPIO16
ledGpio.direction = .OUT // ③This time, current will flow, so use .OUT instead of .IN.

while(true) {
    Thread.sleep(forTimeInterval: 0.2) // ④Update GPIO16 value every 0.2 seconds
    ledGpio.value = ledGpio.value == 0 ? 1 : 0  // ⑤1 turns the LED on, 0 turns it off
}
When I run it in this state, I get an error. . .
wiringPiSetup: Unable to open /dev/mem or /dev/gpiomem: Permission denied.
  Aborting your program because if it can not access the GPIO
  hardware then it most certianly won't work
If you look closely, it seems that an error occurs if you do not have permission to /dev/gpiomem
In Ubuntu, you can It seems that root authority is required for access, and as a result of investigation, we were able to solve it by executing the following command! (Reference)
$ sudo apt install rpi.gpio-common
$ sudo adduser "${USER}" dialout
$ sudo reboot
When you’re ready, connect your Raspberry Pi to your breadboard and run SwiftHomeLED with swift run!
If the LED blinks like ↓, it’s a success! !
By the way, there is a tool called WiringPi as a way to easily manipulate GPIO values outside of Swift code. .
By using this, you can check and operate the GPIO status from Terminal!
Wrap up
This time, I introduced how to run Swift on a Raspberry Pi and make it blink.
You can see the code I implemented this time at SwiftHomeLED!
Next is “2. Run Vapor – Communicate between iPhone and Raspberry Pi with Vapor“!