3. Read sensor value with Raspberry Pi – Get weight sensor value
This article is based on the session presented at iOSDC2022, Make your home safer and more convenient with Swift!
This article is a continuation of the article “2. Moving Vapor – Communication between iPhone and Raspberry Pi with Vapor 3“. If you haven’t read it yet, please read it!
In this article, I will introduce the implementation to get the value by linking the Raspberry Pi and the weight sensor.

Get weight sensor value
What you want to achieve with the weight sensor
This time, we will link the Raspberry Pi and the weight sensor to determine if there is an object on the sensor
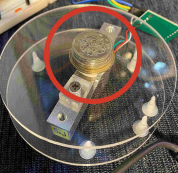
Use ↓ for the weight sensor!
Put the key case here this time
- I have a key case -> I am at home
- I do not have a key case -> I am out
Make it possible to judge

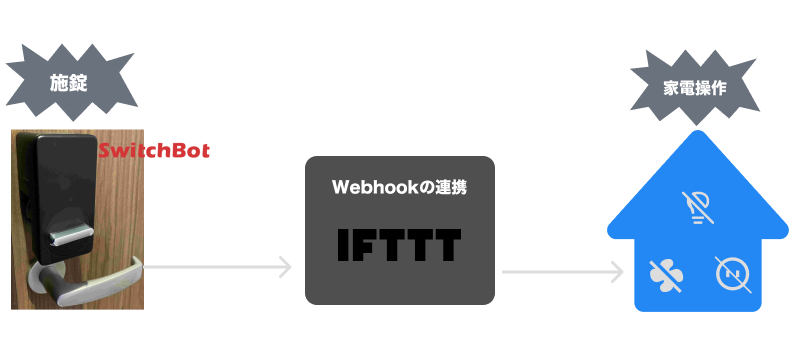
Using the SwitchBot smart lock that I originally used at home, when the key is automatically closed, I turn off the lights in the living room, turn off the fan, and operate the home appliances.
However, when I open the door to receive parcels or throw away garbage, it activates even when the door is automatically locked, so I have to reattach it every time.
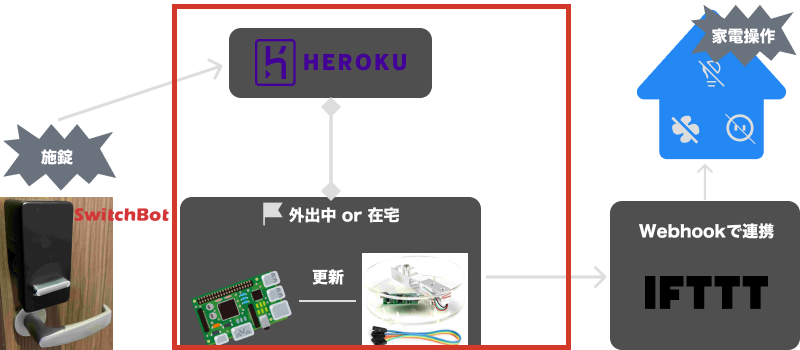
So, the goal this time is to turn off the lights and operate only when you go out with the key case!
What is SwitchBot?
- Companies and platforms that sell devices for smart homes
- Check and confirm light bulbs, plugs, curtains, humidifiers, vacuum cleaners, open/close sensors, door locks, tape lights, etc. from the network. You can sell devices that you can operate (everything written here← is in my house lol)
What is IFTTT?
A service that allows you to link various services by registering triggers and events as recipes. You can use a wide range of services, so it’s a very useful service (it’s currently charged, but it’s convenient, so I’m paying!)
- Talk on Google Home→Turn off Meross lights
- Time comes→Open curtains with SwitchBot
- Approach house→Turn on air conditioner with NatureRemo
Details of our smart home
For those who are interested in the details of smart homes and examples of smart homes in our home, I have done LT at a certain LT meeting before. Check out the materials from that time!

Read weight sensor data
This weight sensor uses an AD converter called HX711 that outputs a 24-bit signal.
Detailed document here.
Data must be obtained in the format SPI.
Normally, you can only get 0 or 1 values from the Raspberry Pi’s GPIO pins, but by using GPIO5 (for data acquisition) and GPIO6 (for clock signal), you can obtain weight analog information in 24-bit units. You can get
Let’s check the actual code
First, prepare an instance of GPIO
As described above, we have prepared instances of GPIO5 and GPIO6.
let gpios = SwiftyGPIO.GPIOs(for: .RaspberryPi4)
// Load sensor
let dataGpio = gpios[.P5]!
// serial clock
let sckGpio = gpios[.P6]!
dataGpio.direction = .IN
sckGpio.direction = .OUT
Next, use the for statement to store the 24-bit data bit by bit in the dataIn variable.
In the for statement, the value is added to the variable dataIn one by one using bit shift.
sckGpio.value = 0
var dataIn: UInt32 = 0
for _ in 0..<24 { // ①Get 24 -bit data 1bit at a time
    sckGpio.value = 1
    dataIn = (dataIn << 1) | UInt32(dataGpio.value) // ②Left bit shift → Reflect new bit in OR
    sckGpio.value = 0
}
Next, check whether the obtained value is within the range of the maximum and minimum values written in the document
And in ③, the process of complementing is executed, but here it is accurate I don’t understand it. .
to calibration by subtracting the initial value from the last calculated Returns the value, here the value processed by the constant referenceUnit.
This time, we defined this process in a method called readWeight().
// 0x7fffff(16777215) is Max value, 0x800000(8388608) is Min value
let maxValue: UInt32 = 16777215 // ①Maximum data on the reference of HX711
let minValue: UInt32 = 8388608    // ②Minimum data on the reference of HX711

if (dataIn == maxValue || dataIn == minValue) { return 0 }
var signedData: Int32 = 0
if (Int32(dataIn & minValue) == 1) {
   // ③Execute the processing of the complement? (Understanding around here is not accurate. ..)
    signedData = Int32(((dataIn ^ maxValue) + 1))
} else {
    signedData = Int32(dataIn)
}
// ④Subtract the original initial value and returns the value processed by the calibration value (RefernceUnit).
return (Double(signedData) - defaultLoadValue) / refernceUnitWhat is calibration?
- In order to measure an accurate value, Adjust the error for each individual sensor
- Using weights like below,
- This time,
referenceUnitis used as the calibration value. and it was refernceUnit = 465.375
Next, create a method to detect that the object on the sensor has been taken.
Create a while loop statement to get the weight of the sensor every second.
And if it’s less than 30g, it does a completion and then a method that monitors for something on the sensor. (The code is here)
By the way, this time I also tried to make the LED light up when I put something on it!
func observeLoadRemoved(completion: (() -> Void)) {
    while(true) {
        sleep(1) // ①Check every second
        if readWeight() > 30 { return } // ②If it is heavier than 30g, leave it as it is
        // ③(Omit: DB status change processing / LED lighting processing)
        completion()
        observeLoadPlaced {
            completion()
        } // ④If the object is removed, monitor the next thing that the object will be placed.
        break
    }
}
This completes the code implementation!
Next, let’s build a circuit!
I will post a diagram and a photo.
The basic diagram and the photo are basically the same circuit, except that the photo uses an expansion board (a tool with a rainbow-colored cable in the photo)!
A total of 4 wires are used, 2 for power supply and 2 for communication.
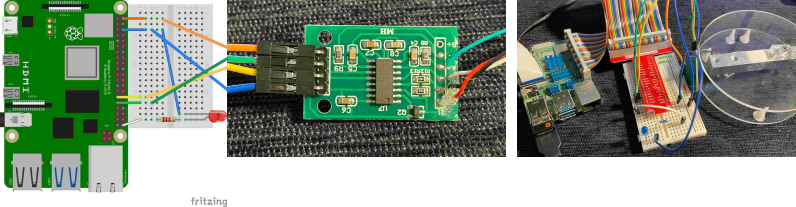
When you’re ready, let’s build!
As you can see in the capture below when I checked the operation, when I put the key case on and removed it, a message was printed, and I was able to turn on the LED when I put something on it! 🎉
Setting up SQLite on Raspberry Pi
When saving data to SwiftHomeApp on Raspberry Pi, I use Vapor’s fluent introduced in the previous article.
The DB uses Postgres in SwiftHomeServer, and the implementation seemed simple, so I used SQLite I tried!
However, this time, we will only use some functions of Vapor itself, so we will not create a template project with Vapor’s CLI, but directly add the necessary libraries to Package.swift. I am trying to add (source code)
dependencies: [
     .package(url: "https://github.com/vapor/fluent.git", from: "4.0.0"),
     .package(url: "https://github.com/vapor/fluent-sqlite-driver.git", from: "4.0.0"),
// (Omit)
],
Also, when using SQLite on a Raspberry Pi, it must be installed in advance using the CLI.
$ sudo apt-get install libsqlite3-devBasic When using fluent, it is often implemented with a Vapor project configuration, so it is rare to use fluent alone, so there was little information, but this time I tried to implement it in the dark. , If you are interested, refer to Code If you can! (If there is a mistake in the implementation method, please point it out!)
Wrap up
This time, I tried to summarize how to use a weight sensor and write an implementation in Swift to get its value.
I tried using the hardware such as the weight sensor, and it turned out to be like an electronic craft, and it was a lot of fun!
Next is a summary article for “4. Linking with a card reader – reading Suica ID“!

Reference
- Swift on Raspberry Pi
- ラズパイを使って、重さをはかるよ
- 24-Bit Analog-to-Digital Converter (ADC) for Weigh Scales
- LeetCode – Complement of Base 10 Integer をSwiftで解説する