Move Vapor – Communicate between iPhone and Raspberry Pi with Vapor 3
This article is based on the session presented at iOSDC2022, Make your home more convenient and safe with Swift! This is the third article that summarizes the contents of Part 2 of the announcement.
This article is a continuation of the article “2. Moving Vapor – Communication between iPhone and Raspberry Pi with Vapor 2“. If you haven’t read it yet, please read it!
This article summarizes how to use CoreMotion to send iPhone altitude information to the Raspberry Pi.
Obtain Altitude Information on iPhone
In order to send the location information and altitude information used to determine whether the landlord is at home to the Raspberry Pi, first let’s get the data on the iPhone
I will omit how to get location information this time (because there are plenty of reference articles on the net!)
Using CoreMotion to get altitude information
To get altitude information in swift, use the CMAltimeter class of CoreMotion.
There are two types of altitude information that can be obtained from CMAltimeter: absolute altitude and relative altitude.
This time, we will use the absolute altitude!
By the way, the SwiftHomeApp app uses relative altitude for reference. is also implemented.
Also, to actually get the data on the iPhone, you need to add the following to Info.plist
Privacy - Motion Usage DescriptionNext is the code to actually get altitude information. (GitHub is here)
① Create an instance of CMAltimeter and ② check if altitude information can be acquired by the device.
And when you call the CMAltimeter instance’s startAbsoluteAltitudeUpdates method, that closure will be called periodically and you can get altitude information from it.
For absolute altitude, you can get the data in meters from data!.altitude.
import CoreMotion

private let altimeterMeter = CMAltimeter() // ① setup instance
if CMAltimeter.isAbsoluteAltitudeAvailable() { // ②Check if CMAltimeter is enable or not
    altimeterMeter.startAbsoluteAltitudeUpdates(to: OperationQueue.main) { data, error in
        // ③Called at a certain timing and can acquire data
        if error != nil { return }
        print(data!.altitude) // 25.007457757686876868(e.g, unit is m)
    }
}
I tried to print the relative altitude ↓
If you hold the actual device and raise it, lower it, bend it, you can output various relative altitudes (laughs)
(When I took a capture, I had both an iPhone and a Mac connected with a lightning cable, but I should have done wireless debugging lol)
By the way, wireless debugging was introduced in the previous article ↓!
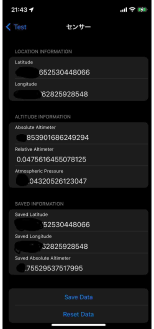
We were able to confirm that the location information and altitude information can be displayed correctly even on the screen ↓ that actually displays the device information of SwiftHomeApp! (It’s completely personal information, so I’m masking some!)
Send altitude information to Raspberry Pi via Heroku
Lastly, let’s send it to the API implemented in the first and second articles and the Heroku server!
First, set the acquired data to the common model DeviceInfoModel defined in SwiftHomeCore.
Then convert that model to a Dictionary type.
By the way, this asDictionary method is defined in a package called SwiftExtensions, which is a collection of extensions that I created for common use in application development. (details are in the article below)

// ①Use common Model defined in SwiftHomeCore
let model = DeviceInfoModel(deviceId: UIDevice.current.identifierForVendor!.uuidString,
                            deviceLatitude: userCoordinate.latitude,
                            deviceLongitude: userCoordinate.longitude,
                            absoluteAltimeter: absoluteAltimeterValue)
let parameters = try! model.asDictionary(using: encoder) // ②extension to convert to Dictionary
All you have to do is post it.
The code below posts using Alamofire.
In the header, we set basic authentication in the same way as when using WebSocket.
By the way, the setting of emptyResponseCodes: [200] means that the API implemented this time only returns a response of .ok when the response is 200, and json etc. Empty because it doesn’t return.
However, in Alamofire, if an empty response is returned, an error occurs as a decoding failure, so I explicitly wrote “If it is 200, it will be empty!”.
AF.request(urlString,
           method: .post, parameters: parameters, // ①Set DeviceInfoModel parameters
           headers: headers) // ②Same setting as webSocket header
.responseDecodable(of: Empty.self, emptyResponseCodes: [200]) { response in
    switch response.result {
    case .success: print("Success")
    // (Omit: error handling)
    }
}
After posting, let’s check if the data is actually saved in Postgres on Heroku!
Heroku has a feature called Dataclips to check the data stored in Postgres, you can run postgresql to check the data (Reference).
Dashboard of Heroku > Menu on the left side of the user icon > Dataclips > Select the created app to proceed to the query input screen ↓
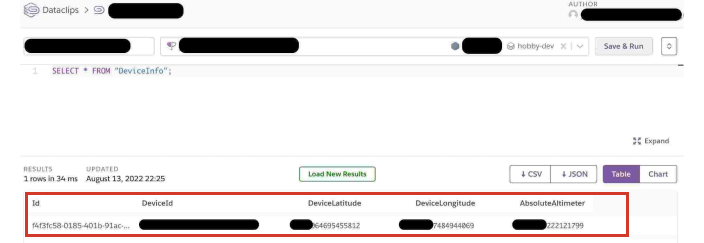
This time, the following query was executed to display all the saved device information. It seems that it is converted to lower case by , and if it is executed as it is, it is not possible to search for the table name registered with capital letters.
By specifying “DeviceInfo”, you can execute a query using the table name that begins with capital letters.
SELECT * FROM "DeviceInfo";As a result, I was able to confirm that the data was properly saved as shown below! 🎉
Wrap up
This is the end of Part 2, “Running Vapor – Communication between iPhone and Raspberry Pi with Vapor“.
It turned out to be quite a long story! !
By using Vapor, you can easily build a server with Swift and share some code on the client side, which I thought was a great development experience!
Next is a summary article of “3. Read sensor value with Raspberry Pi – Get weight sensor value“