Move Vapor – Communicate between iPhone and Raspberry Pi with Vapor 2
This article is based on the session presented at iOSDC2022, Make your home more convenient and safe with Swift! This is the second article that summarizes the contents of Part 2 of the announcement.
This article is a sequel to 2. Moving Vapor – Communication between iPhone and Raspberry Pi with Vapor 1. If you haven’t read it yet, please read it!
This article is mainly about setting up Heroku!

Heroku Setup
Here we will set up to deploy the server app implemented with Vapor on Heroku.
Deploying Vapor to Heroku is also in Vapor’s official documentation.
The setup flow is as follows.
- Creating a Heroku account
- Creating an application with a dashboard on Heroku
- Settings to enable building
- Postgres DB settings
- If you are using a private repository, configure SSH
- Build → Deploy
Set up with Heroku Dashboard
First, create an account from here as described in ① above.
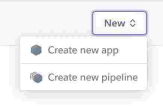
After creating an account, create a new app from the dashboard menu ↓.
The app name set here is also used for the URL when connecting to Heroku.
Next, link with Git
Install heroku CLI with brew.
$ brew install heroku/brew/herokuand log in.
$ heroku login
$ heroku auth:whoami
Then connect your repository to Heroku.
$ heroku git:remote -a your-apps-name-hereAdd a Heroku configuration called BuildPack.
By adding this, Heroku will be able to do things like build and deploy vapor.
BuildPacks can also be changed from your dashboard, from your Heroku app’s Settings page > Buildpacks!
$ heroku buildpacks:set vapor/vaporNext, specify which swift version to use in .swift-version.
This time, specify v5.6.1.
$ echo "5.6.1" > .swift-versionNext, add the build settings for ③.
Add a file called Procfile to the project root directory and add the following text:
Heroku references this file when building.
The first line is the setting to automatically run the migration at the time of release.
The second line is the settings for building the app.
release: Run migrate -y
web: Run serve --env production --hostname 0.0.0.0 --port $PORT
When you’re ready, let’s deploy!
Now you can deploy!
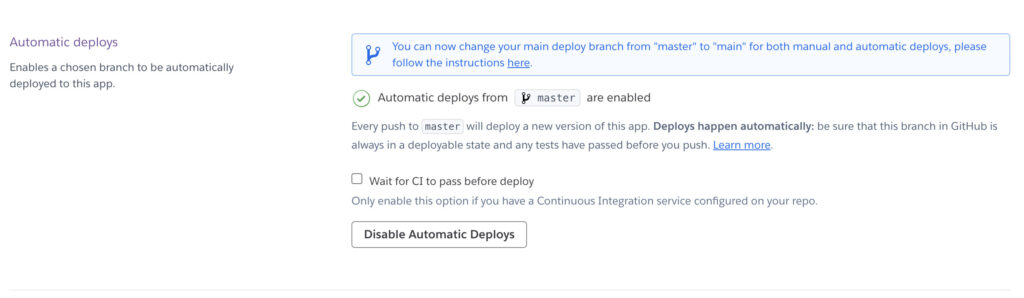
$ git push heroku masterIn addition, if you enable automatic deployment on the Heroku screen, every time you push to the specified branch, Build → Deploy will be executed.
You can check from Heroku > Automatic deploys on Heroku dashboard ↓
Postgres DB Settings
Next, let’s describe the Postgres settings in the project and the Heroku dashboard
First, in order to be able to read the DB URL, host, etc. within the app, we need the necessary information, such as the DB URL and authentication information, in the environment variables. set.
The DB URL used by Heroku is set on the Heroku side.
You can see the Secret set in Settings > Config Vars.

For Mac, it is possible to read when building the application by describing it in the .env file.
The following is a sample, so the data is masked!
DATABASE_HOST=******
DATABASE_USERNAME=******
DATABASE_PASSWORD=******
DATABASE_NAME=******
Next, in configure.swift, write the process to set the DB URL, authentication information, etc.
This time, you need to write two things, one for using on Heroku and one for building on Mac.
When reading an environment variable, you can use Environment.get(“Environment_Variable_Name”) to get the value of the environment variable.
On Heroku, use DATABASE_URL and on Mac use the four items set in the .env file above.
When branching with if, if the value of DATABASE_URL that is not set on Mac can be obtained, it is determined as Heroku, otherwise it is determined as Mac.
// Heroku build
if let databaseURL = Environment.get("DATABASE_URL"), var postgresConfig = PostgresConfiguration(url: databaseURL) {
    postgresConfig.tlsConfiguration = .makeClientConfiguration()
    postgresConfig.tlsConfiguration?.certificateVerification = .none
    app.databases.use(.postgres(configuration: postgresConfig), as: .psql)
} else {
    // localhost build on Mac
     app.databases.use(.postgres(
         hostname: Environment.get("DATABASE_HOST") ?? "localhost",
         port: Environment.get("DATABASE_PORT").flatMap(Int.init(_:)) ?? PostgresConfiguration.ianaPortNumber,
         username: Environment.get("DATABASE_USERNAME") ?? "postgres",
         password: Environment.get("DATABASE_PASSWORD") ?? "password",
         database: Environment.get("DATABASE_NAME") ?? "vapor_database"
     ), as: .psql)
 }
When using Postgres on Mac, the setting is required separately.
Installation of postgresql is OK by executing the following command.
$ brew install postgresql
$ psql --version
$ brew services start postgresql # Activate postgresql
$ brew services list # Check if postgresql is activated or not
Also, if you use Postgres on Heroku, you need to add an add-on.
You can add it by searching for Heroku Postgres from Resources > Add-ons in your dashboard.

Preparations are now complete.
The Vapor code will take care of the rest of the table and column setup for you!
Configure SSH
The SwiftHomeServer deployed this time uses a private repository called SwiftHomeCredentials, so you need to configure SSH on Heroku.
Details on issuing the Ed25519 SSH key used this time are described in the following article.

After that, just register the public key to GitHub and the private key to Heroku!
When registering, register it as an environment variable SSH_KEY in the Config Vars used above.
In that case, it is necessary to register the one converted to base64.
If you execute the following command, you can set all at once!
$ heroku config:set SSH_KEY=$(cat path/to/your/keys/id_ed25519 | base64)This will add a secret called SSH_KEY to the Config Vars as below

This time, add buildpack called
ssh-private-key-buildpack.
Add the above buildpack to your Heroku app's Settings page > Buildpacks and include your existing vapor and heroku , change in the order of ↓
You are now ready to deploy SwiftHomeServer to Heroku!
Deploy and check the operation!
Let’s deploy!
You can push to the specified branch or manually deploy from Deploy >Manual deploy in the dashboard.
You can also check the log during build execution and the completion of deployment from the dashboard!


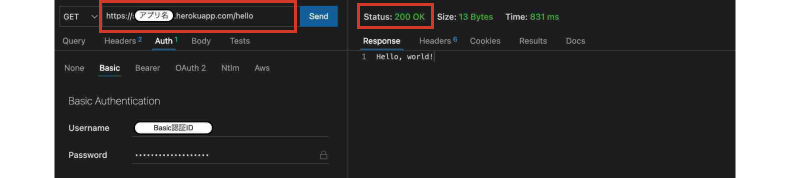
Let’s access the deployed server right away!
Access the /hello generated by the Vapor template project!
This time, I will check the operation using the VSCode extension Thunder Client, which I have been using a lot recently.
Set the URL https:/{Heroku app name}.herokuapp.com/hello and Get.
When you run this, you can see that Hello, world! is displayed like the capture below! 🎉
Wrap up
In this article, we will summarize the contents related to Heroku among the contents related to the announcement of “2. Moving Vapor – Communication between iPhone and Raspberry Pi with Vapor” I got it!
The continuation of this article is “2. Moving Vapor – Communication between iPhone and Raspberry Pi with Vapor 3” using CoreMotion I will show you how to send the altitude information of the iPhone to the Raspberry Pi.