I tried to create a book UI using SwiftUI!
I once saw an app with a book-shaped UI.
As an iOS engineer, I’m very curious to see how things like this are implemented!
So I decided to try making a book-shaped UI myself!
In the end, I ended up making something like this (repository):
There are still some small bugs, but the UI looks pretty similar. By the way, the photos are all of hospital food because I implemented this while I was hospitalized for acute appendicitis lol
https://ulog.sugiy.com/hospitalization-acute-appendicitis/Now, I will introduce the mechanism of this implementation, focusing on the difficulties and the ingenuity involved.
How it’s implemented
The UI for this time looks something like this:
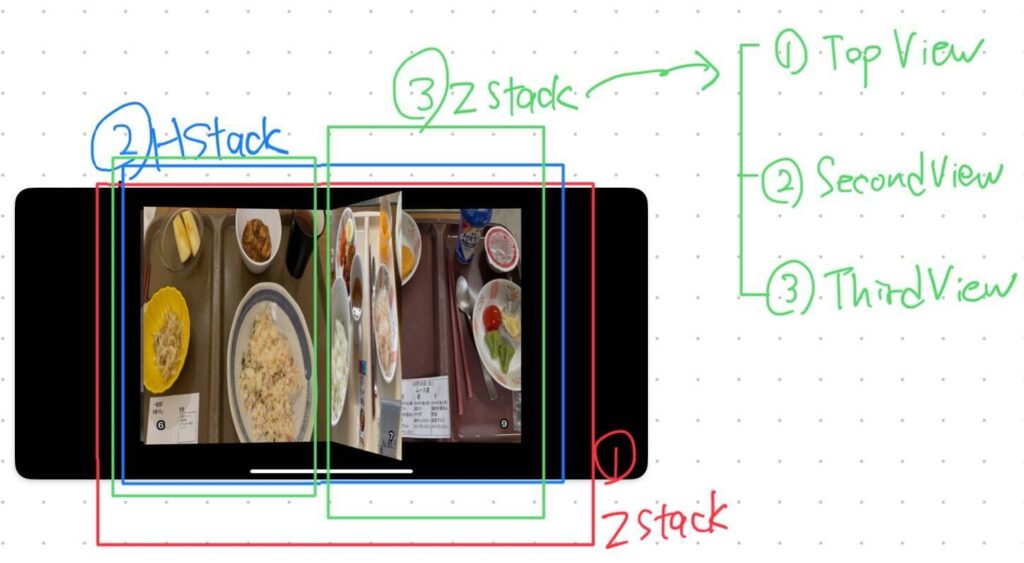
At the top is a ZStack, and below that is an HStack containing the left and right pages.
The left and right pages are each composed of a ZStack, and from the top they each have a TopView, SecondView, and ThirdView (if you look at the left side of the capture, the page being turned in the center is FirstView, the one visible to the left of that is SecondView, and the page slightly visible to the left of that is ThirdView).
Basically, SecondView and ThirdView are just images corresponding to the page, but FirstView needs to be able to see the back page when the page is turned, so two images are set so that the back page can be seen in ZStack.
Each of these data is defined in an enum, and they are each held in an array in @State (code).
The implementation of displaying images on the front and back of this ZStack uses the rotation3DEffect modifier (code).
Implementing page turning animation
Next, we will implement the UI for turning pages. For the page rotation UI, we use the rotation3DEffect mentioned above.
For the left page, the range is 10°~170°, and for the right page, the range is -170°~-10°. For the left page, the right side of the page is specified as the anchor, and for the right page, the left side of the page is specified as the anchor, and these are the axes of rotation (code).
Next, we set the gesture of turning the page with your finger, which uses DragGesture.
This time, we set it to the outermost ZStack in the image above.
Note that this time, there are left and right pages, so two gestures are set, but if we just use the .gesture modifier, the gesture will not work properly, so to make both gestures work properly, we use the .simultaneousGesture modifier for the DragGesture on the right.
This time, we set the degree of this page-turning gesture to be available in the app as an animationRatio, a double value between 0 and 1, within a specified range.
All that’s left to do is bind the value of this DragGesture gesture to the rotation3DEffect above, and you’re done.
As for the order of display in the Z direction when turning pages, if you don’t set anything, the page on the left or right side will be displayed underneath the page you turned to when you turned the page to the opposite side.
To prevent this, we use the .zIndex modifier on the left and right ZStack in ③ in the above image, dynamically changing the zIndex of the ZStack for the page you are currently turning to 1 and the other pages to 0, so that the page you are turning to is always displayed on top.
To automatically go forward or backward when you stop turning pages, we use withAnimation during the onEnded of DragGesture to set the animationRatio to 1 or 0.
Also, in the completion of withAnimation, we reset the dataSource enum array to be displayed in the ZStack of the left and right pages (code).
When you turn a page, the previous or next page automatically turns over a little.
This time, in accordance with the gesture of turning the page, the previous page on the left will turn little by little for the left page, and the next page on the right will turn little by little for the right page.
This is an application of the above page-turning implementation, but as mentioned above, the TopView rotates the left page in the range of 10°~170° and the right page in the range of -170°~-10° with rotation3DEffect, but the SecondView below it moves the left page in the range of 0°~10° and the right page in the range of -10°~0°
Therefore, the SecondView binds that angle and animationRatio (code)
UI that displays shadows when turning pages
This also follows the same mechanism as the implementation in the previous section, implementing a modifier called .overlay(.black.opacity(opacity)) for each View to dynamically change the opacity according to the animationRatio (code).
Note that if the opacity is set to the 0-1 range, the shadows will be too dark, so the range is adjusted using the computed property (code).
UI that lets you see the page below

If you look at the right side of the screenshot again, you can see a little bit of the next page at the top.
How is this implemented? Actually, the width of the page is made smaller according to the animationRatio of the rotation3DEffect rotation ratio of the page.
Specifically, the width of each page is set to x0.5 when the page is exactly in the center. In other words, each time you turn a page, it gradually narrows from the original width to half, and when it passes the center, it widens again toward the original width.
For this reason, when the page is open, the previous page is visible on the left and the next page is visible on the right (here is the code for adjusting the width).
And to make the whole book UI move smoothly, the page width is adjusted not only for the TopView but also for the SecondView.
Wrap up
This time I tried to make a book UI with SwiftUI!
I made a lot of small adjustments that I haven’t written about here, but even with those, there are still some questionable behaviors and there is still a lot of room for improvement.
For a UI that requires such complex animations and state management, you need very fine control.
In making this UI, it was hard to even think about what kind of structure to use in the first place, but I felt that making such complex UIs from time to time allows me to catch up on various things and is a learning experience.
I would like to continue to keep an eye on various things like this and keep my antenna up!