4. Link with card reader – read Suica ID
This article is based on the session presented at iOSDC2022, Make your home safer and more convenient with Swift!
This article is a continuation of the article “3. Read sensor value with Raspberry Pi – Get weight sensor value“. If you haven’t read it yet, please read it!
This article will show you how to read cards with the Pasori reader and run Python code from Swift.
Read Suica ID with Pasori
In this article, I will introduce how to read the Suica ID using Raspberry Pi and Pasori (RC-S380↓).
Cards such as Suica have an ID assigned to them in advance, so check that ID matches the ID you registered in advance.
If they match, you are at home, and the results will be used in the next section.
By the way, this time I will use a surplus Suica at home, but at first it was supposed to use Mobile Suica.
However, due to the specifications of Felica, the MobileSuica ID seems to change each time it is read, so this time we will verify it with a hard Suica (actually reading the ID I thought it was strange because the value was different every time.)
Reference: Mobile FeliCa IC chip Handling of manufacturing ID (IDm) in
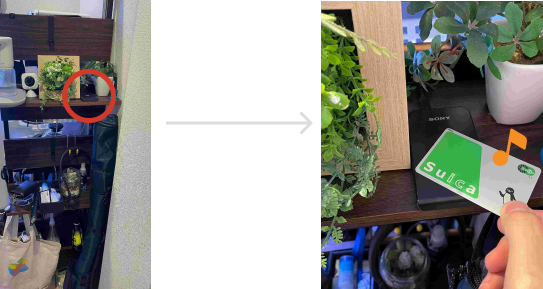
This time, we plan to secretly put this Pasori on the rack at the entrance and authenticate by holding Suica over it when returning home.
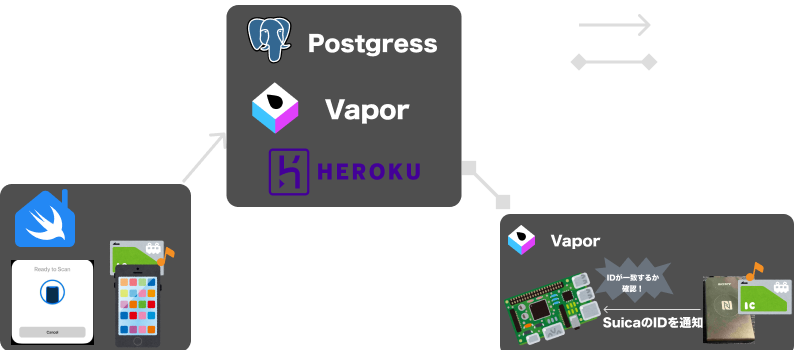
Implementation details of Pasori integration
The image of the implementation is as shown in the figure below
Read the Suica ID with SwiftHomeApp in advance, and via SwiftHomeServer, send to Raspberry Pi and save.
Then hold the Suica over Pasori and authenticate if the ID matches.
This implementation only targets Suica, but you should be able to use other cards depending on the settings
This time, to read data with Pasori, we used a Python library nfcpy.
Since it seemed difficult to implement everything in Swift, I wrote the data reading process in Python and called it from Swift.

Read Pasori data using Python
First, install nfcpy on your Raspberry Pi
① Install nfcpy using pip Install
Then connect Pasori to the USB port of the Raspberry Pi and check if Pasori is recognized on the Raspberry Pi side
By executing the command in ②, you can confirm that =Pasori including Sony is connected among the USB devices.
By the way, it was not recognized by this command, but it came to be displayed by executing the command in ③ → reboot! (Reference)
#① Install nfcpy
$ sudo pip install -U nfcpy
# ②In the list of USB devices, check if Pasori is recognized (ID below is masked)
$ lsusb | grep Sony
> Bus 001 Device 008: ID ******** Sony Corp. RC-S380/S
# ③if displayed as 'No such device'
$ python -m nfc
$ sudo reboot
# Ref: https://www.out48.com/archives/5396/
Next, actually use nfcpy to write the code to read the Suica ID.
The _nfcid value is extracted from the data obtained using nfcpy processing, decoded, and returned.
import nfc
import binascii
// Ref: https://qiita.com/h_tyokinuhata/items/2733d3c5bc126d5d4445
def read_id():
    print("Touch!")
    clf = nfc.ContactlessFrontend("usb")
    tag = clf.connect(rdwr={'on-connect': lambda tag: False})
    tag_id = binascii.hexlify(tag._nfcid).decode()
    clf.close()
    return tag_id
Call Python processing from Swift
Next is the code that calls this Python process from the Swift side
This time, to make it easier to write the code that calls Python We will use a library called PythonKit and a library called PathKit to get the path of the file, so set them up. will
dependencies: [
     .package(url: "https://github.com/pvieito/PythonKit", branch: "master"),
     .package(url: "https://github.com/kylef/PathKit", from: "1.0.0"),
],
And let’s write the process to call the main Python code
As for how to implement, first specify the directory where the Python file you want to call is located, as in ①.
This time we will be running on Raspberry Pi, so Path.current will be the hierarchy that clones the repository.
And then, like ②, import the Python file you want to read
And finally, like ③, you can call Python code by specifying a Python method.
In this case, when you call this readNfcId method, it behaves like actually holding Suica over Pasori, reading the ID, and then returning that string.
import PythonKit
import PathKit
func readNfcId() -> String {
    let sys = Python.import("sys")
    let path = "(Path.current)/Sources/SwiftHomePi" // ①Specify the path of Python file
    sys.path.append(path)
    let readNfc = Python.import("read_nfc") ②import Python file
    return readNfc.read_id().description // ③Call the Read_id of the Python file
}
The full code is here!
By the way, the code that calls Python methods uses a feature called Dynamic Member Lookup that allows you to access properties that aren’t available at compile time (Reference)
This is a process to check if the last read ID matches the saved ID
let id = PythonCall().readNfcId()
guard let savedNfcId = try await DataStore.shared.fetchNfcId() else { // ①Fetch registered ID
print("Cannot find NfcId in sqlite DB")
return
}
if id == savedNfcId.nfcId {
print("This card is registered!")
} else {
print("This card is not registered")
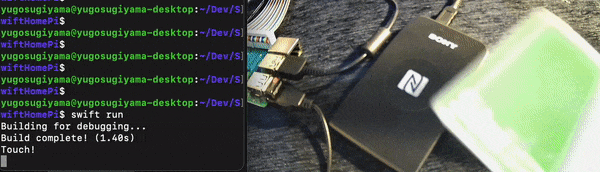
}Once it’s implemented, let’s run it!
I didn’t have two Suica cards at home this time, so I’m using Suica and nanaco to verify!
I was able to confirm that only Suica was successfully authenticated! 🎉
Implementation to read Suica on iPhone
The implementation on the Raspberry Pi side has been completed, but as a bonus, here is a sample code to read Suica implemented in SwiftHomeApp
If you implement it as is, you will use the CoreNFC module, but this time, to make it easier to implement, I use the library TRETJapanNFCReader implemented by treastrain/Tanaka Ryoga.
The code itself can be written as follows to obtain the Suica ID
import Foundation
import CoreNFC
import TRETJapanNFCReader_FeliCa
import TRETJapanNFCReader_FeliCa_TransitIC

final class CardReaderViewModel: NSObject, ObservableObject {
    @Published private(set) var suicaId = ""
    private var reader: TransitICReader!
    private var transitICCardData: TransitICCardData?

    override init() {
        super.init()
        reader = TransitICReader(delegate: self)
    }

    func readCard() {
        reader.get(itemTypes: TransitICCardItemType.allCases)
    }
    // (Omit: Post Suica ID to SwiftHomeServer)
}

extension CardReaderViewModel: FeliCaReaderSessionDelegate {
    func feliCaReaderSession(didRead feliCaCardData: FeliCaCardData, pollingErrors: [FeliCaSystemCode : Error?]?, readErrors: [FeliCaSystemCode : [FeliCaServiceCode : Error]]?) {
        let suicaId = feliCaCardData.primaryIDm
        DispatchQueue.main.async {
            self.suicaId = suicaId
        }
    }

    func feliCaReaderSession(didInvalidateWithError pollingErrors: [FeliCaSystemCode : Error?]?, readErrors: [FeliCaSystemCode : [FeliCaServiceCode : Error]]?) {
    }

    func japanNFCReaderSession(didInvalidateWithError error: Error) {
    }
}
When reading Suica, the following settings are required in addition to the above code
- Add
Privacy - NFC Scan Usage Descriptionin Info.plist - In Info.plist
ISO18092 system codes for NFC Tag Reader Session as an array and add the value 0003 to that item
This 0003 value is a code that specifies a Transportation IC card, and you need to register everything you want to read here in advance. !
This code is detailed in the library README.
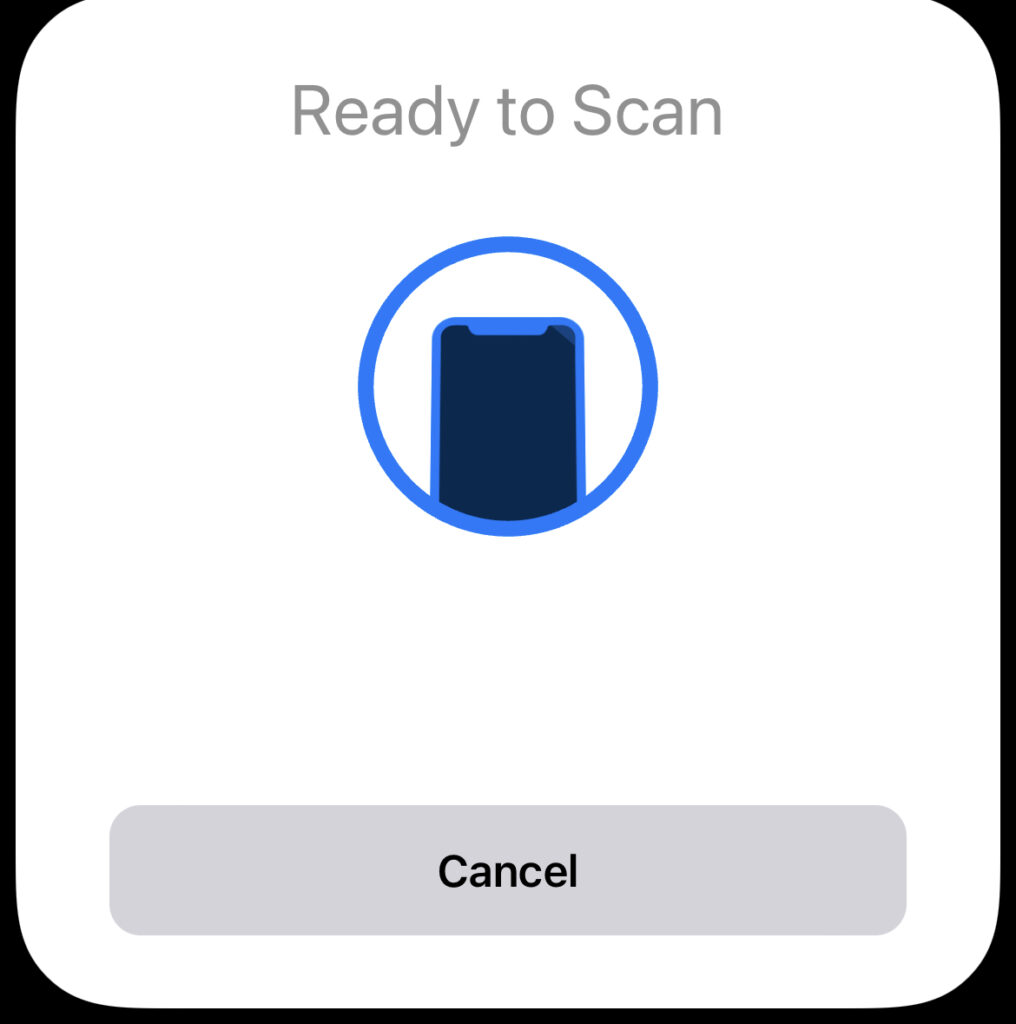
Now, when you call readCard(), you’ll see a familiar card reader screen! ! 🎉
Wrap up
In this article, I summarized the implementation method to call the processing of reading Pasori card information written in Python from Swift!
While I think that Pasori authentication itself can be applied to various things, it is necessary to have a firm grasp of the technical specifications of Felica.
Technical topics around here look pretty interesting, so I thought I’d try to study them later!
The next article is “5. Use the motion sensor – Attack from here“!

Reference
- ラズパイにパソリを繋いでNFCタッチ!
- NFC(免許証やおサイフケータイ)のIDmやUIDがリーダーで読み取るたびに変わる問題 – PaSoRiでの読み取り実装
- From Swift Import Python