- Operate device network status etc. from Xcode
- I want to check the operation of my iPhone or iPad when the network environment is bad!
- 1. How to change from the "Developer" function of the "Settings" app of the device
- 2. Change from the Xcode menu (<- the main topic)
- Bonus 1: How to control the heat generation state of the device
- Bonus 2: How to take a screenshot of your device from Xcode
- Summary
Operate device network status etc. from Xcode
I want to check the operation of my iPhone or iPad when the network environment is bad!
When developing an application, checking its operation, or investigating a bug, there are times when you want to verify when the network environment deteriorates.
However, it is quite difficult to operate the actual network environment! (At home, maybe you can do it by turning off the power of the router? Lol)
Therefore, we have summarized a method to check the operation in such situations without changing the settings of the network itself! !! In addition, I also summarized some other things that can be set and operated from Xcode.
- How to change from the “Developer” function of the “Settings” app of the device
- How to change from the Xcode menu (<-main topic)
- Bonus 1: How to control the heat generation state of the device
- Bonus 2: How to take a screenshot of your device from Xcode
- Mac: Big Sur v11.3.1
- Xcode: 12.5
- iPadAir4th: iPadOS v14.5.1
1. How to change from the “Developer” function of the “Settings” app of the device
This is a way to use the so-called device developer features. To use this feature, you need to have a device that has built the app once, as it can be anything in Xcode. (However, if you update the OS, you will have to build the app again)
Then, a menu called “Developer” will be added to the Settings app.
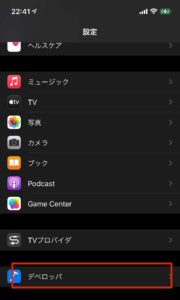
Tap that menu, then tap “Network Link Conditioner” and you will see a screen like the one below.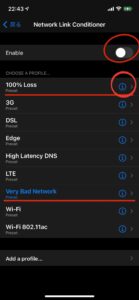
Here, turn on “Enable” and select any mode.
Some of the modes can be understood by name, but you can check the details by tapping the round details button on the right side.
I often use “100% Loss” / “Very Bad Network”.
Now I can reproduce the bad network environment!
One caveat is that after this verification is complete, let’s turn off “Enable” firmly!
Otherwise, you’ll end up with wasted network restrictions while using your device normally (I forgot this before and it took me a while to notice it lol).
2. Change from the Xcode menu (<- the main topic)
The following is how to change the network settings from the Xcode side of the main subject.
This method can be executed with Xcode 11 or later (currently, the limiter should be using 11 or later).
I think it is strange for those who think that it is okay if Wi-Fi and carrier network are cut out from the method 1. and the control center mentioned earlier.
However, it may not be possible to verify various things if the application executes processing such as screen update when entering the background, entering from the background, or when you are in the control center.
Actually, the following application has such processing, and it is difficult to verify by the above method.
That’s where the method of operating from Xcode on Mac without operating on the terminal side comes into play!
Connect your device to your Mac with a Lightning cable or type-c cable.
Then select “Window”-> “Devices and Simulators” from the menu at the top of Xcode.
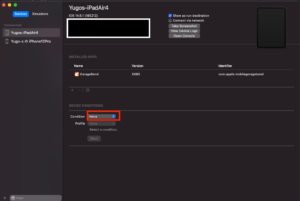
その画面の中の「Condition」の隣、上記のスクショで赤く囲われた箇所を選択すると、1.の方法と同様に、色々なコンディションが出てくるので、検証目的にあったものを選択しましょう。
そして「Start」ボタンを押します。
これでデバイス側を操作せずに、端末のネットワーク状況を操作できます。
この状態では、デバイス側の上部のステータスバーに以下のスクショにあるようなグレーのボタン?エリアが表示されます。
If you select the part surrounded by red in the above screenshot next to “Condition” on that screen, various conditions will appear as in method 1, so select the one that suits your verification purpose.
Then press the “Start” button.
Now you can operate the network status of the terminal without operating the device side.
In this state, a gray button? like the one in the screenshot below on the status bar at the top of the device side is displayed.
To cancel the operation, (1) tap “Stop” in the Xcode menu, (2) tap the gray button above, tap “Stop”, and (3) unplug the cable.
Bonus 1: How to control the heat generation state of the device
As with the network connection environment, you may want to verify the operation check when the device is heating up.
In such a case, you can operate from Xcode and simulate in the same way as in 2. By changing the “Condition” selected in 2. to “Thermal State”, you can select (1) Fair, (2) Serious, and (3) Critical.
③ can reproduce the state where the heat generation is stronger.
It is not possible to set both the operation of the network environment and the heat generation state, so when verifying, do one by one!
Bonus 2: How to take a screenshot of your device from Xcode
You can also take screenshots of the actual device from the Xcode side. Just tap “Take Screenshot” in the Device menu as well! Tap to save the screenshot on your desktop.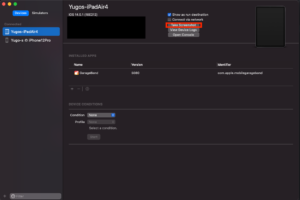
Since AirDrop cannot be used on my company Mac for security reasons, I used to take the procedure of sending screenshots taken with the actual machine with Slack etc. and downloading them on the Mac, but after finding this method, Now that you can take screenshots of your device from your Mac, you don’t have to send them to Slack every time!
Summary
When the user is using the app, the device status may be stable, or the network environment or device heat generation status may not be good.
Especially if the app is for general users and has a large number of users, the condition of the user’s device is diverse.
I thought that the debug function I investigated this time was very useful to confirm that the app works well even in such a bat condition.
I will use it to improve the quality of the app, both personally and at work!