2. Vaporを動かす- iPhoneとラズパイ間をVaporで通信 1
この記事はiOSDC2022で発表したセッション、Swiftで我が家を より便利に、安全に!の発表の第2部の内容をまとめた記事の第1弾になります。
この記事は、1. ラズパイでSwiftを動かす – GPIOを使って、LEDを点滅させる の記事の続編です。もしまだ読んでいない方は読んでいただけると!

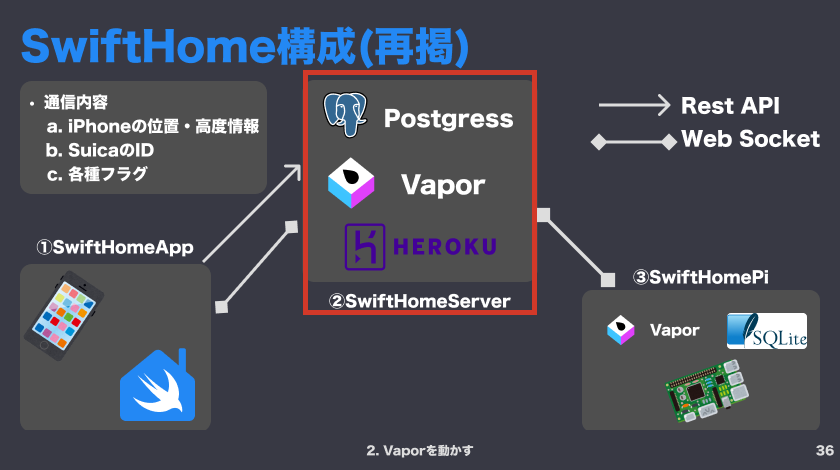
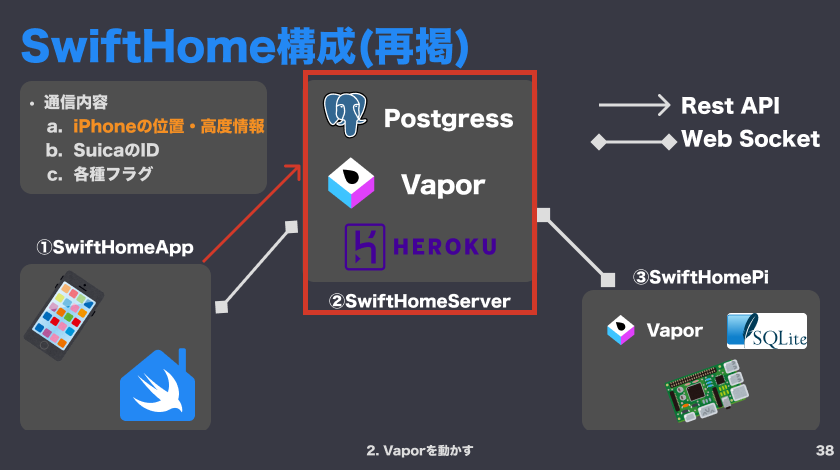
この部では、SwiftHomeServerの実装を紹介します。
Vaporとは?
- ServerSideSwiftのフレームワークの1つ
- フロントとサーバー側をSwiftで書くことで、Codableのレスポンスやモデルなどのコードを共通化できるメリットがある
- アプリとサーバーで同じモデルを使うことで、パースエラーは起きない!
- DBやWebSocketも簡単に利用できる
- 執筆時はMacとLinuxで利用可能
- ドキュメントが充実しているので、開発を始めやすい!
- Ref: https://vapor.codes
Vaporの実装をする
SwiftHomeServerの実装の流れ
- SwiftHomeServerというVaporのプロジェクトをMacで作成する
- API, WebSocketなどを実装する→動作確認
- HerokuにSwiftHomeServerをデプロイする
- SwiftHomeApp, SwiftHomePiからSwiftHomeServerに接続する
開発環境
- MacBook Pro(14インチ、2021、Apple M1 Pro)
- macOS
- Monterey 12.2.1
- Xcode 13.4.1
- Vapor4 (執筆時の最新版)
- toolbox: 18.5.1
- Vaporで利用するCLIツール
Vaporのインストール
まずはインストールしてみましょう!
今回はMacでインストールして、テンプレートのプロジェクトを作成します。
$ brew install vapor
$ vapor --help
$ vapor new SwiftHomeServer
# ① Select using Fluent or not. (ORM framework for Swift.)
> Would you like to use Fluent? (--fluent/--no-fluent) #→ y
# ②Select database(If using in Heroku, ‘Postgres’ is required.)
> Which database would you like to use? (--fluent.db) #→ y
# ③Select using Leaf or not.(a powerful templating language with Swift-inspired syntax.)
> Would you like to use Leaf? (--leaf/--no-leaf) #→ y or n(this time, n)Macでのインストールは、brewで実行できます。vapor new ${ProjectName}でテンプレートのプロジェクトを作成することができます。
実行後に、いくつかオプションを聞かれます。
最初にFluentというVaporでデータベースを実装しやすくするためのライブラリを使用するかを聞かれます。
ここでyesを選択すると、どのデータベースを使用するかを聞かれます。
今回はHerokuにデプロイする想定なので、Herokuで使用できるPostgresを選択します。
最後にLeafというSwiftベースで、動的なHTMLを生成できるツールです。
今回は使用しないので、ここはnoです
テンプレートのプロジェクトの動作確認をしてみる
$ cd SwiftHomeServer
$ swift runビルドが成功したら、ブラウザなどでhttp://localhost:8080/helloを実行してみましょう。
それで、Hello,world!と表示されれば成功です!🎉 (参考)
ちなみにルーティング処理は以下のように書かれています。
// (Omit)
func routes(_ app: Application) throws {
    app.get { req async in // ①Called if no endpoint specified
        "It works!"
    }
    // ②can use async/await
    app.get("hello") { req async -> String in // ③Specify the endpoint and method type here
        "Hello, world!"
    }
// (Omit)①の箇所がどのエンドポイントの指定もない場合に呼ばれるGetのAPIで、③は/helloの指定があるときに呼ばれるGetのAPIです。
上記で動作確認した通り、Hello, world!と返すように実装してあります
SwiftHomeServerのPostのAPIを実装する
次にSwiftHomeServerのPostのAPIを実装します。
今回は、SwiftHomeAppからiPhoneの位置や高度情報をPostするAPIを実装します。
routes.swiftにAPIの定義を追加する
まずは先ほど確認したテンプレートにあるroutes.swiftにAPIの定義を追加します。
今回は、Basic認証の設定を適用するような追加実装も行うので、それを先に確認しましょう。
ここで実装するBasic認証のstructはSwiftHomeServer以外でも使用するので、SwiftHomeServerCoreというpublicのPackageに共通コードとして定義しています。
まずはAuthenticatable protocolを適用したUser structとAsyncBasicAuthenticatorのstructを実装する。
ここで、API実行時に設定されたusernameとpasswordが事前に設定されたものと一致しているかを確認しています。
例のごとく、basic認証の情報は、SwiftHomeCredentialsを参照しています。
import Vapor
import SwiftHomeCredentials

// Ref: https://docs.vapor.codes/security/authentication/
public struct User: Authenticatable {
    public let name: String
}

public struct UserAuthenticator: {
    public init() {}

    public func authenticate(
        basic: BasicAuthorization,
        for request: Request
    ) async throws {
        let userCredential = SwiftHomeCredentials.basicAuthentication // defined in SwiftHomeCredentials
        if basic.username == userCredential.id && basic.password == userCredential.password {
            request.auth.login(User(name: \(username_defined)))
        }
   }
}上記の実装ができたら、これらのstructを使って、最初にprotectedを宣言し、テンプレートで書かれているappの代わりにこのprotectedを使用します。
これでBasic認証の設定は完了です!とても簡単!!
エンドポイントに指定しているEndPointKind.deviceInfo.endPointは、SwiftHomeCredentialsに定義しているエンドポイント情報をまとめたenumです。
Stringの変数で設定する場合、.constant()をつける必要があります。
次にデータがPostされた後の処理を見てみましょう!
まずはreq.contentにあるrequestのbodyの内容をdecodeします。contentにdecodeというメソッドがあるので、指定の型でdecodeします。
今回は、SwiftHomeCoreに定義しているモデルを使用していて、送信側でも共通のモデルを使用しているので、パースエラーが発生することはありません。
その後、カスタムで実装したasDBModelのextensionメソッドで、DB処理を行いやすくするclassに変換するメソッドを実行します。
そのclassを使って、DB更新処理を行います(後述)。
次に③でWebSocket送信用のjsonに変換し、④でWebSocketで送信します(同じく詳細は後述)。
そしてエラーが発生しなければ、⑤で.okを返却します。
// protected is an implementation that applies Basic authentication
let protected = app.grouped(UserAuthenticator())
// ①Post API can be implemented by setting post
protected.post(.constant(EndPointKind.deviceInfo.endPoint)) { req async throws -> HTTPResponseStatus in
    let response = try req.content.decode(DeviceInfoModel.self).asDBModel // ②Convert to model for DB
// (Omit: Process of storing data in Postgres)
    let jsonString = try response.asJsonString() // ③asJsonString converts Encodable to json
    try await deviceInfoWebSocket?.send(jsonString) // ④Send data to Raspberry Pi (details will be described later)
    return .ok // ⑤Returns ok if no Error is thrown
}
DB更新処理を実装する
次に上記で省略したDB更新処理を確認します。
まずはDB更新処理で使用するclassを実装します。
先にコードを記載します。
import Fluent
import Vapor

public enum DeviceInfoModelFields: FieldKey {
    case deviceId
    case deviceLatitude
    case deviceLongitude
    case absoluteAltimeter
}

public final class DeviceInfoDBModel: Model, Content {

    public static let schema = "DeviceInfo"

    @ID(key: .id)
    public var id: UUID?

    @Field(key: DeviceInfoModelFields.deviceId.rawValue)
    public var deviceId: String
    @Field(key: DeviceInfoModelFields.deviceLatitude.rawValue)
    public var deviceLatitude: Double
    @Field(key: DeviceInfoModelFields.deviceLongitude.rawValue)
    public var deviceLongitude: Double
    @Field(key: DeviceInfoModelFields.absoluteAltimeter.rawValue)
    public var absoluteAltimeter: Double

    public init() {}

    public init(deviceId: String, deviceLatitude: Double, deviceLongitude: Double, absoluteAltimeter: Double) {
        self.id = UUID()
        self.deviceId = deviceId
        self.deviceLatitude = deviceLatitude
        self.deviceLongitude = deviceLongitude
        self.absoluteAltimeter = absoluteAltimeter
    }

    public func update(model: DeviceInfoDBModel) {
        deviceId = model.deviceId
        deviceLatitude = model.deviceLatitude
        deviceLongitude = model.deviceLongitude
        absoluteAltimeter = model.absoluteAltimeter
    }
}ここの実装は、VaporのドキュメントのFluent/Modelのセクションにも記載がありますが、ModelとContentを継承したclassをまず作成します。
そしてstaticのschemaと主キーとして使用する@IDと@Fieldのattributeをつけた変数を定義します。@Fieldで指定している文字列は、他の箇所でも共通で使用するので、DeviceInfoModelFieldsというenumを定義し、その値を使用するようにしています。
またupdateメソッドを用意し、DeviceInfoDBModelを渡して、このclassの値を一括で更新できるようにしています。
DB用のclassが準備できたら、①migrationや②DBの更新をするclassを定義しましょう。
コードはそれぞれGitHubに記載しています(①CreateDeviceInfo、②DeviceInfoController)
①はconfigure.swift、②は、routes.swiftでそれぞれ設定する処理を追加しています。
この辺りの実装は、テンプレートで生成されたサンプルコードを参考にしています。
app.migrations.add(CreateDeviceInfo())try app.register(collection: DeviceInfoController())次に実際の更新処理を書きましょう。
ここでは、すでに保存済みのデータがある場合、そのデータを更新して、まだデータが保存されていない場合、新規にデータを追加する実装になっています。
// ①If saved, update the data; if not saved, create new
if let deviceInfoModel = try await DeviceInfoDBModel.query(on: req.db) // ②Extract data from DB
    .filter(\.$deviceId == response.deviceId).all().first { // ③Extract all data matching deviceId
    deviceInfoModel.update(model: response)
    try await deviceInfoModel.save(on: req.db) // ④Save updated data
} else {
    try await response.create(on: req.db) // ⑤Save new data
}
Model protocolにqueryメソッドを実行することで、そのclassで定義した情報をDBから取得することができます。
②では、その取得したデータをfilterでdeviceIdに一致するもので絞り込み、その中の先頭のデータを取得しています(執筆時点では、first(where: {})のメソッドは定義されていなかったです)。
データがある場合は、classのデータを更新し、saveメソッドを呼び出します。
データがない場合は、createメソッドを呼び出します。
これでデータ更新処理は完了です!!
WebSocketの実装をする
Vaporを使ったWebSocketの実装方法を確認する
まずはVaporを使って、WebSocketをどうやって実装するかを確認します。
サーバー側とクライアント側に分けて実装する必要があります。
サーバー側は、今までのAPI同様に、routes.swiftにapp.webSocket(Endpoint)を使用して、定義します。
クライアントサイドは、WebSocket.connect(to: URL)を実行して、接続処理を行うことができます。
それぞれ接続されると、クロージャー内が呼ばれ、webSocketインスタンス(ws)が取得できるので、そのインスタンスを保持しておきます。
// ①Server-side in routes.swift
app.webSocket("echo") { req, ws in // ②Get, Post同様にWebSocketのメソッドを設定する
    // Connected WebSocket.
    echoWebSocket = ws // ③Keep webSocket instance
}
// ④Client-side
WebSocket.connect(to: "ws://echo.websocket.org", on: eventLoop) { ws in
    // Connected WebSocket.
    echoWebSocket = ws // ⑤Keep webSocket instance
}データを送信するには、sendメソッドを使います。
文字列と数値の配列を送ることができます。
var echoWebSocket : WebSocket?
// (Omit)

// ①when sending text
echoWebSocket?.send("Hello, world")

// ②when sending integer([UInt8])
echoWebSocket?.send([1, 2, 3])データを受け取るときは、onText/onBinaryを使います。
// ①when receiving text
echoWebSocket?.onText { ws, text in
    print(text)
}
// ②when receiving integer([UInt8])
echoWebSocket?.onBinary { ws, binary in
    print(binary)
}WebSocketを終了するには、closeメソッドを呼びます。
echoWebSocket?.close()これで実装方法の確認は完了です!
すごい簡単で、ありがたいです!!
例のごとく、公式のドキュメントに丁寧に実装方法が記載されています!
SwiftHomeServerのWebSocketの実装をする
次にSwiftHomeServerとSwiftHomePiで位置や高度情報をやりとりするWebSocketを実装します。
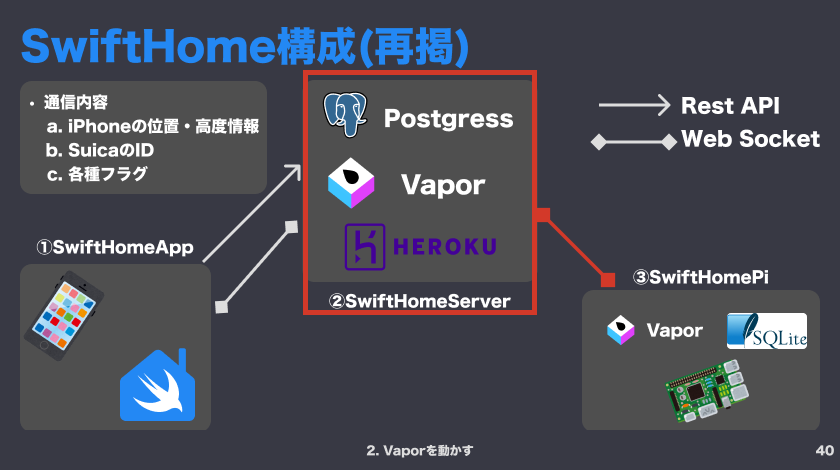
まずはサーバー側の定義です。
先ほどのサンプルと違うのは、Basic認証を設定している点です。
設定方法は、PostのAPIと同じです(わかりやすくて、ありがたい!)
var deviceInfoWebSocket: WebSocket?
// (Omit)
protected.webSocket(.constant(EndPointKind.deviceInfo.webSocketEndPoint)) { _, ws in
    deviceInfoWebSocket = ws // ①Keep webSocket instance
    ws.onText { ws, text in
        print(text)
    }
}
// (Omit)
try await deviceInfoWebSocket?.send(jsonString) // ②Send post data using WebSocket
次にラズパイからの接続処理の実装です。
ここでは、Basic認証のheaderを設定する実装も行っています。
①でSwiftHomeCredentialsからBasic認証の情報を取得します。
②でid/passwordの情報をutf8でData型に変換し、③でbase64に変換します。
④でVapor.HTTPHeadersを使って、headerに設定します。
あとはこのheadersを先ほど紹介したconnectメソッドの引数に設定すれば、完了です!!🎉
private var deviceInfoWebSocket: WebSocket?
// ①ID/Password is defined in SwiftHomeCredentials
let basicAuthentication = SwiftHomeCredentials.basicAuthentication
// ②Convert ID/Password data to data type with utf8
let plainString = "\(basicAuthentication.id):\(basicAuthentication.password)".data(using: .utf8)
// ③convert to base64
let credential = plainString?.base64EncodedString(options: [])
// ④set base64 in header
let headers: Vapor.HTTPHeaders = [
    "Authorization": "Basic \(credential!)"
]
// (Omit) // ⑤serverConfigはLocalhostとHerokuの接続を切り替えやすくする処理
_ = WebSocket.connect(to: "\(serverConfig.URLString(type: .webSocket))/\(EndPointKind.deviceInfo.webSocketEndPoint)", headers: headers, on: eventLoopGroup) { [weak self] ws in
    guard let self = self else { return }
    // ⑥Retain the WebSocket instance after connecting
    self.deviceInfoWebSocket = ws
    // (Omit: DB update process)
}
次の記事へ
記事が長くなってきたので、続きは、↓に書きます!