1.Get sensor data – call Python code from Swift
This article is an article that summarizes the contents of the first part of the session presented at iOSDC2023, the presentation of growing apples with Swift.
It is about the implementation of ① in the following figure
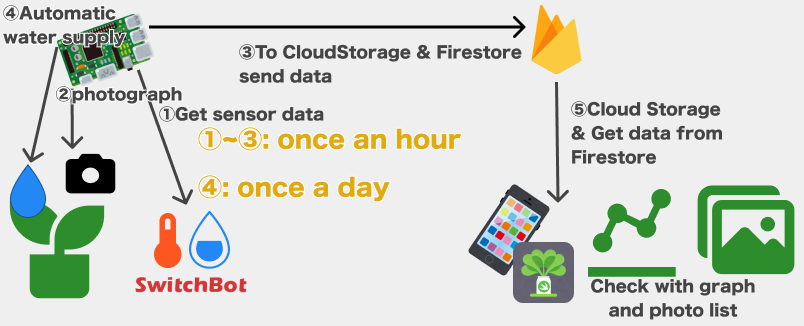
This is a continuation of the article “0. Introduction – Announcement and overview of SwiftGarden”. If you haven’t read it yet, please read it!

Get data from SwitchBot’s sensors
The temperature and humidity sensor of the following SwitchBot is used as a sensor this time.
SwitchBot data can be obtained via API (also used in last year’s presentation materials)
However, unlike last year’s announcement, the mechanism around authentication has been changed to v1.1, and it is necessary to issue a unique signature when executing the API (Reference).
Other than that, the information is the same as in the article above
This time Swift is assumed to run on Linux, and CryptoKit cannot be used, so it can be used on Linux as well< I was supposed to use swift-crypto.
On the above SwitchBot site, samples that issue this signature are listed in multiple languages, but there were no samples implemented using Swift.
An example code implementation using swift-crypto is below
Tokens and secrets can be issued from the SwitchBot app
import Crypto

static func generateAuthInfo() throws -> SwitchbotAuthInfo {
    let token = Secrets.Switchbot.token
    let secret = Secrets.Switchbot.clientSecret
    let timestamp = String(Int64(Date().timeIntervalSince1970 * 1000))
    let nonce = UUID().uuidString
    let data = token + timestamp + nonce

    let key = SymmetricKey(data: secret.data(using: .utf8)!)
    let hmac = HMAC<SHA256>.authenticationCode(for: data.data(using: .utf8)!, using: key)
    let sign = Data(hmac).base64EncodedString()

    return .init(nonce: nonce, timestamp: timestamp, sign: sign, token: token)
}
But for some reason this time (build with another high priority async-http-client Because an error occurred on RaspberryPi at times), instead of issuing in Swift using this swift-crypto, the signature is issued by the method using Python described later (If you use other methods, you can also issue in Swift It seemed possible, but it seemed to be dangerous for security, so I gave up)
Call Python code from Swift
Processing Python calls from Swift using PythonKit, which was also used in last year’s presentation

The difference from last year’s implementation is that (1) Python is versioned with pyenv when running on Mac, and (2) Python The result of processing with is returned as a return value and used on the Swift side
First of all, it is an implementation when using pyenv, but since the command side of Python cannot be read as it is, it is necessary to specify which version of the library to use
The following is a sample code when specifying to use 3.10.6 for Mac and 3.9.0 for Raspberry Pi.
        let pythonPath: String
#if os(Linux)
        pythonPath = "/lib/arm-linux-gnueabihf/libpython3.9.so"
#else
        pythonPath = "/Users/${USER}/.pyenv/versions/3.10.6/lib/libpython3.10.dylib"
#endif
        PythonKit.PythonLibrary.useLibrary(at: pythonPath)
        do {
            try PythonLibrary.loadLibrary()
        } catch {
            print(error)
        }
Then, refer to the sample code on the SwitchBot page and prepare the following code
import json
import time
import hashlib
import hmac
import base64
import uuid
import sys

def generate_sign(token, secret):
    nonce = str(uuid.uuid4())
    t = str(int(round(time.time() * 1000)))
    string_to_sign = '{}{}{}'.format(token, t, nonce)
    string_to_sign = bytes(string_to_sign, 'utf-8')
    secret = bytes(secret, 'utf-8')
    sign = base64.b64encode(hmac.new(secret, msg=string_to_sign, digestmod=hashlib.sha256).digest())
    data = {
        "token": token,
        "timestamp": t,
        "sign": str(sign, 'utf-8'),
        "nonce": nonce
    }
    return json.dumps(data) // return string json-formatted

if __name__ == "__main__":
    token = sys.argv
    secret = sys.argv
    result = generate_sign(token, secret)
Register the above generate_sign.py in package.swift as a resource, call the above code in the following format, convert the received JSON format string to a Decodable struct, and execute API with Swift side code can provide the necessary elements for
struct SwitchbotAuthInfo: Decodable {
    let nonce: String
    let timestamp: String
    let sign: String
    let token: String
}

static func generateAuthInfo() throws -> SwitchbotAuthInfo {
    let jsonString = try PythonCall.generateSwitchbotSign()
    let jsonData = jsonString.data(using: .utf8)!
    let info = try JSONDecoder().decode(SwitchbotAuthInfo.self, from: jsonData)
    return info
}
After that, set the necessary information in the header in the following format, execute the API, and you’re done! (The following is an implementation using Alamofire)
let authInfo = try generateAuthInfo()
let headers: Alamofire.HTTPHeaders = [
    .authorization(authInfo.token),
    .init(name: "sign", value: authInfo.sign),
    .init(name: "t", value: String(authInfo.timestamp)),
    .init(name: "nonce", value: authInfo.nonce)
]
If this succeeds, you will get a JSON like below! (Some values are omitted)
{
    "message": "success",
    "body": {
        "humidity": 79,
        "deviceType": "Meter",
        "temperature": 24.1,
        "version": "V2.5",
        "battery": 87
    }
}
You now have the temperature and humidity data you need!
Wrap up
This article summarizes how to get SwitchBot sensor data in SwiftGarden by combining Python and Swift.
The next article is “2. Send data to Firebase with Raspberry Pi – Run Swift’s CLI tool”!