- I made the first Swift UI-based app!
- What I learned / tried
- How to implement SearchBar
- View of stars for review
- Common component of View for title + content
- AsyncImage to get images asynchronously
- Card-shaped carousel View
- How to transition from List to Detail
- Loading page
- Communication processing of Alamofire that supports Swift Concurrency
- Bonus: How to use Rakuten Travel Vacancy Search API
- Impressions!
I made the first Swift UI-based app!
After a long time, I thought I’d write some code for my personal development, so I made a simple Swift UI-based app.
I learned a lot, so I will leave it as a memorandum.
It’s an app that I made in about 3 days, so there is a possibility that there may be problems, so I plan to update that area when I have time in the future.
The sample app I made this time is an app called WorkHotel that allows you to search for a hotel with a corresponding vacancy on the map.
What I learned / tried
How to implement SearchBar
In the case of UIKit, there was something called UISearchBar, but SwiftUI also has a function to display SearchBar.
You can view it by using a modifier called searchable (Implements). However, it must be described in NavigationView .
The cancel button is also automatically displayed when focusing.
.searchable(text: $viewModel.searchText, placement: .navigationBarDrawer, prompt: Text("Search for place names"))
If you want to display the Placeholder, you can display it by specifying the parameter prompt.
It’s not very customizable, but it’s easy to implement, so if you’re not particular about the design, I think this is enough.

View of stars for review
Since I wanted to display the review information this time, I implemented a View that displays the stars for review that I often see as follows.

The implemented code can be found in StarReviewView.swift.
The implementation is to pass a Double, for example 4.5, and place 4 red stars, a red star with a width of 0.5 and a gray star behind it.
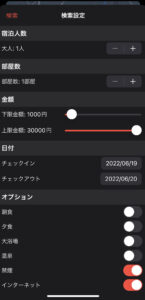
Common component of View for title + content
This time, on the details screen and option setting screen, the title + custom component was often displayed, so as a common component, SubTitleView.swift has been implemented.
This component is designed to pass a String for the title and aView for display under that title, where the View is passed using viewbuilder.
public struct SubTitleView<T: View>: View {

    private let title: String
    private let childView: T
    private let padding: CGFloat = 4

    public init( title: String, @ViewBuilder childView: () -> T) {
        self.title = title
        self.childView = childView()
    }

    public var body: some View {
        VStack(alignment: .leading, spacing: 0) {
            HStack {
                Text(title)
                    .font(.system(size: 18, weight: .semibold))
                    .foregroundColor(Color(.label))
                    .background(Color.clear)
                    .padding(.horizontal, padding)
                Spacer()
            }
            .frame(height: 40)
            .background(Color(UIColor.systemGray5))
            childView
                .background(Color(UIColor.systemBackground))
                .padding(padding)
        }
    }
}
AsyncImage to get images asynchronously
Until iOS14, if you want to get the URL image asynchronously, you had to implement or use the library by yourself, but iOS15 can use the standard View called AsyncImage. This time I tried using the AsyncImage (Implementation location)
For the argument, set the URL of the image to be displayed, and set transaction if you want to apply animation such as fade when displaying the image.
In the closure, you can get the value AsyncImagePhase, and you can individually sort out the views to be displayed during (1)image acquisition, (2)error, and (3)View shown while loading.
However, it does not support image cache, so if you want to cache downloaded images and reduce the number of communications, create your own custom or using libraries like swiftui-cached-async-image.
AsyncImage(url: hotelInfo.hotelImageURL, transaction: Transaction(animation: .easeInOut(duration: 0.6))) { phase in
    if let image = phase.image {
        image
        .resizable()
        .aspectRatio(contentMode: .fill)
    } else if phase.error != nil {
        Text("No image")
    } else {
        ProgressView()
    }
}
Card-shaped carousel View
In this sample app, the hotel information is displayed as a pin and a list, but the list is displayed in the form of a carousel at the bottom of the screen, and you can swipe sideways to display the previous and next cards.
The implementation is described in CarouselView.swift).

How to transition from List to Detail
Generally, if you want to make a push type screen transition in SwiftUI, you should use NavigationLink as follows.
List {
    ForEach(items, id: .self) { item in
        NavigationLink(
            destination: Text(item),
            label: {
                Text(item)
            }
        )
    }
}
However, in the case of this app, when I surrounded the view of the card with NavigationLink with the above implementation, the swipe gesture and theNavigationLink gesture were mixed, and the app did not work well.
Therefore, in this app, instead of directly enclosing the view of the card with NavigationLink as described above, tap the card to switch the flag of isPushNavigationActive and display the details screen when it becomes true.(Implements)
NavigationLink(isActive: $viewModel.isPushNavigationActive) {
    workHotelDetailView
} label: {
    EmptyView()
}
Also, for the detailed screen of the transition destination, since it is necessary to pass the detailed information fetched asynchronously with the API, it is generated at the time of screen transition with ViewBuilder.
In this View, the transition source View is a card, so in the above NavigationLink, the transition source View is EmptyView.
@ViewBuilder
private var workHotelDetailView: some View {
    if !viewModel.hotelList.isEmpty, viewModel.hotelList.count > viewModel.selectedIndex {
        WorkHotelDetailView(hotelInfo: viewModel.hotelList[viewModel.selectedIndex])
            .navigationBarTitle("Hotel Detail", displayMode: .inline)
    } else  {
        EmptyView()
    }
}
Loading page
For Loading during communication, we are using the overlay modifier.
It monitors the properties of isLoading and displays ProgressView when it is true.
.overlay {
    if viewModel.isLoading {
        ProgressView("Fetching data, please wait...")
            .progressViewStyle(CircularProgressViewStyle(tint: Color(WorkHotelCommon.themeColor)))
    }
}
Communication processing of Alamofire that supports Swift Concurrency
The communication process of this sample app uses Swift Concurrency, and Alamofire already supports SwiftConcurrency, so this time it using.
The implementation is simple, just write the following.
R is a struct of Decodable.
let response = await AF.request(requestURL, method: method).serializingDecodable(R.self).responseAs a response, DataResponse <Decodable, AFError> is returned.
You can get the Decodable value with response.value, the error with response.error, and the HTTPURLResponse with response.response.
The Decode work can also be done by Alamofire, so the amount of code description is small.
Bonus: How to use Rakuten Travel Vacancy Search API
This app uses Rakuten Travel Vacancy Search API to fetch data.
As for the usage method, you can use it just by registering with RakutenID, so the hurdle of usage itself is low.
However, when I implemented it, I noticed that each property of the response does not know which one is returned as null, so if the one that is not set to Optional in Decodable is returned as null, I get a parse error with Decodable.
In order to prevent that, I think that there is no choice but to set all the property as Optional, or to use the response of API and set the one returned by null to Optional as appropriate.
Impressions!
In the image so far, SwiftUI seemed to be for simple screens and UI, but this time I implemented it based on SwiftUI, and I felt that I could make a fairly complicated UI with SwiftUI.
Various updates related to SwfitUI were announced in WWDC22 yesterday, and I felt that it would be easier to write and use apps with SwiftUI in the future. Currently, there are situations where we need to use the power of UIKit, but even considering development efficiency, I think that there will be more situations where SwiftUI will be used, so I thought I would strengthen the catch-up of SwiftUI.