Create custom shortcuts in Xcode!
What are Xcode custom shortcuts?
We can make settings that cannot be done with standard Xcode shortcuts.
I use Visual Studio Code in addition to Xcode and the shortcuts used in VSCode, for example, shortcut of copy of the line where the cursor is,
and you can move the code of the specified line up and down, etc can be used in Xcode!
The following gif is the one when the shortcut is actually used (I’m sorry for the poor image quality .. 🙇♂️)
How to create a custom shortcut in Xcode?
We can find Xcode shortcuts in Key Bindings in Xcode settings.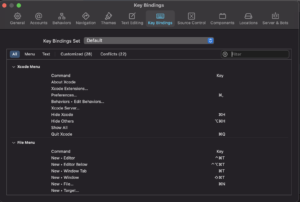
But to add a custom shortcut, you need to edit a file called IDETextKeyBindingSet.plist.
This file is stored in /Applications/Xcode.app/Contents/Frameworks/IDEKit.framework/Versions/A/Resources/IDETextKeyBindingSet.plist.
Open this file and add the following!
<key>Original Direction</key>
<dict>
	<key>Duplicate Current Line Original</key>
	<string>moveToBeginningOfLine:, deleteToEndO
fLine:, yank:, insertNewline:, moveToBeginningOfLine:, yank:</string>
	<key>Move Line Up Original</key>
	<string>selectParagraph:, cut:, moveBackward:, moveToBeginningOfParagraph:, paste:, moveBackward:, moveToBeginningOfParagraph:</string>
	<key>Move Line Down Original</key>
	<string>selectParagraph:, cut:, moveToEndOfParagraph:, moveRight:, paste:, moveBackward:, moveToBeginningOfParagraph:</string>
	<key>Continue Newline Original</key>
	<string>moveToEndOfLine:, insertNewline:</string>
</dict>
Here, four custom shortcuts are registered.
① Duplicate Current Line Original
This is a shortcut to copy the line of code that the cursor is pointing to above to the line below it
② Move Line Up Original
This is a shortcut to move the line of code that the cursor is over to the line above it.
③ Move Line Down Original
This is the version that moves under ②.
④ Continue Newline Original
This is a shortcut that breaks into a new line, like when you press enter at the end of a line, even if the cursor is in the middle of the line code.In the <string> part of the added code, what kind of processing is executed when the shortcut is executed is written in order.
By customizing here, you can create your own shortcuts.
You can check the full text of the file you are using from the following.

Assign shortcut keys in Xcode
After editing the above IDETextKeyBindingSet.plist, restart Xcode once. Then open Key Bindings on the Xcode settings screen and you should see the items you set earlier.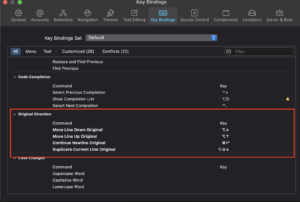
All you have to do is assign a shortcut key to each shortcut.
As you can see from the screenshot above (the image quality may be a little poor …), in my case,
It is set as follows so that it can be used in the same way as VSCode.
①Duplicate Current Line Original → shift + option + ↓
②Move Line Up Original → option + ↑
③Move Line Down Original → option + ↓
④Continue Newline Original → command + Enter
Depending on your Xcode settings, you may see a ⚠️ next to the shortcut key (you can see it in the screenshot above).
This is because the shortcut key conflicts with other shortcuts.
To solve this, assign another shortcut key to the shortcut set this time, or assign another shortcut key to another conflicting shortcut.
In my case, I didn’t use the other shortcuts that were in conflict, so I assigned them the appropriate shortcuts and resolved the conflict!
Now you can use the shortcut you created in Xcode 🎉
When you download a new version of Xcode
The shortcut set above cannot be used as it is in the newly downloaded Xcode, so you need to set it again.
However, it is difficult to copy the corresponding file in the back of the Xcode folder every time.
So I created a script to copy the file to the specified version of Xcode and use it every time.
## Specify the xcode version and replace the KeyBindingFile with a custom one ($ 1: Xcode version, $ 2: IDETextKeyBindingSet.plist path)
function replaceKeybindingFile() {
  # null check of arg1
  if [ ! -n "$1" ]; then
    echo "arg1(xcode version number) is required!"; return
  fi
  # Numerical judgment of arg1
  expr "$1 + 1" > /dev/null 2>&1
  if [ ! $? -lt 2 ]; then
    echo arg1 must be xcode version number!; return
  fi
  #Determining if the arg1 version of Xcode is in the application folder
  XcodePath=/Applications/Xcode$1.app
  if [ ! -e $XcodePath ]; then
    echo Xcode$1.app does not exist in Applications directory!; return
  fi
  KeyBindingFilePath=""
  PrivateKeyBindingFilePath=$HOME/SettingFiles/Xcode/XcodekeyBinding/IDETextKeyBindingSet.plist
  if [ -n "$2" ] && [ -e $2 ] && [ `basename $2` = IDETextKeyBindingSet.plist ]; then
      KeyBindingFilePath=$2
  elif [ -e $PrivateKeyBindingFilePath ]; then
    KeyBindingFilePath=$PrivateKeyBindingFilePath
    echo Default file: $HOME/SettingFiles/Xcode/XcodekeyBinding/IDETextKeyBindingSet.plist will be used!
  else
    echo "arg2(`$KeyBindingFilePath`) is invalid!"; return
  fi
  XcodeKeyBindingFilePath="/Applications/Xcode$1.app/Contents/Frameworks/IDEKit.framework/Versions/A/Resources/IDETextKeyBindingSet.plist"
  cp -f $KeyBindingFilePath $XcodeKeyBindingFilePath
  echo "keybinding file of Xcode$1.app was replaced!"
}
This can be done as follows:replaceKeybindingFile Xcode13 Applications/Xcode12.app/Contents/Frameworks/IDEKit.framework/Versions/A/Resources/IDETextKeyBindingSet.plist
The shortcut settings for Xcode12 are now available for Xcode13.
In my case, I manage IDETextKeyBindingSet.plist with Git,
and it is stored in the specified directory, if I do not specify the file path with the above command the path for that file will be set by default, so it is executed likereplaceKeybindingFile Xcode13.
All you have to do is assign a shortcut key in Xcode as well (it’s annoying to have to do this every time …)
The above script is included in the repository that automates the Mac environment construction mentioned in the previous article, so it can be used as soon as the initial settings of the Mac are completed.

Wrap up
This time I’ve summarized how to set custom shortcuts in Xcode!
After making this setting, we can develop speedily in Xcode 🎉
In my case, I was developing with VSCode before using Xcode, so I was quite stressed because I could not use VSCode shortcuts, so after this setting, common shortcuts for VSCode / Xcode It’s usable, convenient, and easy to understand!
There is no day when I don’t use this shortcut after making this setting lol
If you have any useful shortcuts you are using or have created, I would be grateful if you could let me know!