Let’s check how to use AVPlayer!
How do videos play on iOS?
There is a place to play the video in our application, but I did not know how to implement it without implementing the video playback, so I checked it.
There are various ways to play videos, but this time I’ve summarized the basic usage of AvPlayer and what you can do. You can check the sample apps implemented this time from here. For details on the implementation, please check this repository.
What I want to check this time
- Play / stop HLS (mp4) format video
- Get playback status
- Change the playback speed
- Play in the specified number of seconds with the slider
- Fast forward / rewind for a specified number of seconds
- Adjust the volume
- iOS14.1
- Xcode12.1
- macOS Catalina v10.15.6
1. Play / stop HLS (mp4) format video
In the first place, HLS is a video playback standard developed by Apple. For more information, please check sites such as here. First of all, I will describe the part implemented in the above application.
private let avPlayer = AVPlayer()
private let avPlayerLayer = AVPlayerLayer()
private var avPlayerItem: AVPlayerItem?

private func setupPlayer() {
    // ①Create an AV Asset
    let avAsset = AVAsset(url: URL(string: "http://devimages.apple.com/iphone/samples/bipbop/bipbopall.m3u8")!)
    // ②Create an AVPlayerItem based on AvAsset
    let avPlayerItem = AVPlayerItem(asset: avAsset)
    self.avPlayerItem = avPlayerItem
    // ③Set avPlayerItem to avPlayer
    avPlayer.replaceCurrentItem(with: avPlayerItem)
    // ④Set AVPlayerLayer to View
    playerView.layer.addSublayer(avPlayerLayer)
    // ⑤Set AVPlayer to AVPlayerLayer
    avPlayerLayer.player = avPlayer
    avPlayerLayer.frame = playerView.frame
    avPlayerLayer.videoGravity = .resizeAspect
    avPlayerLayer.needsDisplayOnBoundsChange = true
}
Code for different settings is also included, but the basic procedure is below steps.
- Create an AV Asset
- Create an AVPlayerItem based on AvAsset
- Set avPlayerItem to avPlayer
- Set AVPlayerLayer to View
- Set AVPlayer to AVPlayerLayer
avPlayer.play()When you execute upper command, the set sample video will be played. If you want to play the mp4 video, you can change the URL to the mp4 one and it will play with the same implementation as above.
@IBOutlet private weak var timeControlStatusLabel: UILabel!

switch avPlayer.timeControlStatus {
  case .playing: self.timeControlStatusLabel.text = "Playing"
  case .paused: self.timeControlStatusLabel.text = "Paused"
  case .waitingToPlayAtSpecifiedRate: self.timeControlStatusLabel.text = "WaitingToPlayAtSpecifiedRate"
  @unknown default: fatalError()
}
3. Change the playback speed
You can check the playback speed from avPlayer.rate. You can change the playback speed by changing this value. Set to 1 for 1x speed, and set to 2 for 2x speed. In this app, 0.5 / 1/2x speed can be switched by using segment switching as a trigger.
@IBAction private func onPlaySpeedValueChanged(_ sender: UISegmentedControl) {
  if sender.selectedSegmentIndex == 0 {
    avPlayer.rate = 0.5
  } else if sender.selectedSegmentIndex == 1 {
    avPlayer.rate = 1
  } else if sender.selectedSegmentIndex == 2 {
    avPlayer.rate = 2
  }
}
4. Play in the specified number of seconds with the slider
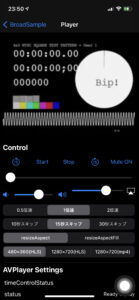
This is a function that allows you to move the Slider in the Control section of the app screenshot and change the playback time of the video according to the progress. In AVPlayer, when using this function, use a struct such as CMTime. (reference)
@IBAction func onDurationSliderValueChanged(_ sender: UISlider, forEvent event: UIEvent) {
  guard let touchEvent = event.allTouches?.first else { return }
  switch touchEvent.phase {
  case .began:
    isSliderDragging = true
  case .ended:
    // ①Find the target playback time from the slider value
    let seconds = Double(sender.value) * itemDuration
    let timeScale = CMTimeScale(NSEC_PER_SEC)
    // From the target playback time, generate `CMTime` to actually change the playback time.
    let time = CMTime(seconds: seconds, preferredTimescale: timeScale)
    changePosition(time: time)
    isSliderDragging = false
  case .cancelled:
    isSliderDragging = false
  default: break
  }
}

private func changePosition(time: CMTime) {
  // Update Slider UI based on time value
  updateDurationSlider(time: time)
  let rate = avPlayer.rate
  // Temporarily stop while changing time
  avPlayer.rate = 0
  avPlayer.seek(to: time) { [weak self] completed in
  if !completed { return }
    // Play again when the changes are complete
    self?.avPlayer.rate = rate
  }
}
5. Fast forward / rewind for a specified number of seconds
This function, like the function in 4, fast forwards and rewinds a specified time from the current playback time. There are some parts in common with the implementation of 4. In this app, 10/15/30 seconds can be specified for verification.
private var offsetDefaultTime: Double = 15

@IBAction func back(_ sender: Any) {
  offsetTime(offset: -offsetDefaultTime)
}

@IBAction func forward(_ sender: Any) {
  offsetTime(offset: offsetDefaultTime)
}

private func offsetTime(offset: Double) {
  let timeScale = CMTimeScale(NSEC_PER_SEC)
  // Create a struct for `CMTime` based on the time (seconds) you want to adjust
  let rhs = CMTime(seconds: offset, preferredTimescale: timeScale)
  // Add or subtract the number of seconds for offset to the current time (avPlayer.currentTime()).
  let time = CMTimeAdd(avPlayer.currentTime(), rhs)
  changePosition(time: time)
}
6. Adjust the volume
Here, we will implement to adjust the volume of the video according to the value of the slider.
You can change the volume of the video by changing the value of avPlayer.volume (minimum value is 0, maximum value is 1).
@IBAction func onVolumeSliderValueChanged(_ sender: UISlider) {
  setVolume(volume: sender.value)
}

private func setVolume(volume: Float) {
  avPlayer.volume = volume
  volumeSlider.value = volume
}
Summary
During the research and implementation, I got a rough idea of how to use it.
However, there are various settings that can be made in more detail, so I’d like to gradually grasp them while developing them in the future.
Reference materials
@IBOutlet private weak var statusLabel: UILabel!
private var observers: [NSKeyValueObservation] = []

observers.append(avPlayer.observe(.status, options: .new, changeHandler: { [unowned self] (avPlayer, value) in
  // If you use value, it becomes nil
  switch avPlayer.status {
  case .readyToPlay: self.statusLabel.text = "Ready to play"
  case .failed: self.statusLabel.text = "Failed"
  case .unknown: self.statusLabel.text = "unknown"
  @unknown default: fatalError()
  }
}))
(Actually, the value after being changed to value should flow, but for some reason it becomes nil, so I am getting the value of avPlayer.status directly) Also, the status during playback / stop is avPlayer.timeControlStatus You can get it, but like status, KVO monitors changes.
@IBOutlet private weak var timeControlStatusLabel: UILabel!

switch avPlayer.timeControlStatus {
  case .playing: self.timeControlStatusLabel.text = "Playing"
  case .paused: self.timeControlStatusLabel.text = "Paused"
  case .waitingToPlayAtSpecifiedRate: self.timeControlStatusLabel.text = "WaitingToPlayAtSpecifiedRate"
  @unknown default: fatalError()
}
3. Change the playback speed
You can check the playback speed from avPlayer.rate. You can change the playback speed by changing this value. Set to 1 for 1x speed, and set to 2 for 2x speed. In this app, 0.5 / 1/2x speed can be switched by using segment switching as a trigger.
@IBAction private func onPlaySpeedValueChanged(_ sender: UISegmentedControl) {
  if sender.selectedSegmentIndex == 0 {
    avPlayer.rate = 0.5
  } else if sender.selectedSegmentIndex == 1 {
    avPlayer.rate = 1
  } else if sender.selectedSegmentIndex == 2 {
    avPlayer.rate = 2
  }
}
4. Play in the specified number of seconds with the slider
This is a function that allows you to move the Slider in the Control section of the app screenshot and change the playback time of the video according to the progress. In AVPlayer, when using this function, use a struct such as CMTime. (reference)
@IBAction func onDurationSliderValueChanged(_ sender: UISlider, forEvent event: UIEvent) {
  guard let touchEvent = event.allTouches?.first else { return }
  switch touchEvent.phase {
  case .began:
    isSliderDragging = true
  case .ended:
    // ①Find the target playback time from the slider value
    let seconds = Double(sender.value) * itemDuration
    let timeScale = CMTimeScale(NSEC_PER_SEC)
    // From the target playback time, generate `CMTime` to actually change the playback time.
    let time = CMTime(seconds: seconds, preferredTimescale: timeScale)
    changePosition(time: time)
    isSliderDragging = false
  case .cancelled:
    isSliderDragging = false
  default: break
  }
}

private func changePosition(time: CMTime) {
  // Update Slider UI based on time value
  updateDurationSlider(time: time)
  let rate = avPlayer.rate
  // Temporarily stop while changing time
  avPlayer.rate = 0
  avPlayer.seek(to: time) { [weak self] completed in
  if !completed { return }
    // Play again when the changes are complete
    self?.avPlayer.rate = rate
  }
}
5. Fast forward / rewind for a specified number of seconds
This function, like the function in 4, fast forwards and rewinds a specified time from the current playback time. There are some parts in common with the implementation of 4. In this app, 10/15/30 seconds can be specified for verification.
private var offsetDefaultTime: Double = 15

@IBAction func back(_ sender: Any) {
  offsetTime(offset: -offsetDefaultTime)
}

@IBAction func forward(_ sender: Any) {
  offsetTime(offset: offsetDefaultTime)
}

private func offsetTime(offset: Double) {
  let timeScale = CMTimeScale(NSEC_PER_SEC)
  // Create a struct for `CMTime` based on the time (seconds) you want to adjust
  let rhs = CMTime(seconds: offset, preferredTimescale: timeScale)
  // Add or subtract the number of seconds for offset to the current time (avPlayer.currentTime()).
  let time = CMTimeAdd(avPlayer.currentTime(), rhs)
  changePosition(time: time)
}
6. Adjust the volume
Here, we will implement to adjust the volume of the video according to the value of the slider.
You can change the volume of the video by changing the value of avPlayer.volume (minimum value is 0, maximum value is 1).
@IBAction func onVolumeSliderValueChanged(_ sender: UISlider) {
  setVolume(volume: sender.value)
}

private func setVolume(volume: Float) {
  avPlayer.volume = volume
  volumeSlider.value = volume
}
Summary
During the research and implementation, I got a rough idea of how to use it.
However, there are various settings that can be made in more detail, so I’d like to gradually grasp them while developing them in the future.
Reference materials
2. Get playback status
When you try to play a video, it is not possible to play it immediately after executing the code in 1. It depends on the communication environment, but you can’t actually play it until it’s downloaded to some extent first.
So, let’s see how to get the status of whether it is ready for playback. This status can be played by checking the status property of the AvPlayer’s enum and if it is .readyToPlay.
For verification, this app outputs the status to Label so that you can check the change of this property, but KVO (Key Value Observing) is used to monitor the change of status.
@IBOutlet private weak var statusLabel: UILabel!
private var observers: [NSKeyValueObservation] = []

observers.append(avPlayer.observe(.status, options: .new, changeHandler: { [unowned self] (avPlayer, value) in
  // If you use value, it becomes nil
  switch avPlayer.status {
  case .readyToPlay: self.statusLabel.text = "Ready to play"
  case .failed: self.statusLabel.text = "Failed"
  case .unknown: self.statusLabel.text = "unknown"
  @unknown default: fatalError()
  }
}))
(Actually, the value after being changed to value should flow, but for some reason it becomes nil, so I am getting the value of avPlayer.status directly) Also, the status during playback / stop is avPlayer.timeControlStatus You can get it, but like status, KVO monitors changes.
@IBOutlet private weak var timeControlStatusLabel: UILabel!

switch avPlayer.timeControlStatus {
  case .playing: self.timeControlStatusLabel.text = "Playing"
  case .paused: self.timeControlStatusLabel.text = "Paused"
  case .waitingToPlayAtSpecifiedRate: self.timeControlStatusLabel.text = "WaitingToPlayAtSpecifiedRate"
  @unknown default: fatalError()
}
3. Change the playback speed
You can check the playback speed from avPlayer.rate. You can change the playback speed by changing this value. Set to 1 for 1x speed, and set to 2 for 2x speed. In this app, 0.5 / 1/2x speed can be switched by using segment switching as a trigger.
@IBAction private func onPlaySpeedValueChanged(_ sender: UISegmentedControl) {
  if sender.selectedSegmentIndex == 0 {
    avPlayer.rate = 0.5
  } else if sender.selectedSegmentIndex == 1 {
    avPlayer.rate = 1
  } else if sender.selectedSegmentIndex == 2 {
    avPlayer.rate = 2
  }
}
4. Play in the specified number of seconds with the slider
This is a function that allows you to move the Slider in the Control section of the app screenshot and change the playback time of the video according to the progress. In AVPlayer, when using this function, use a struct such as CMTime. (reference)
@IBAction func onDurationSliderValueChanged(_ sender: UISlider, forEvent event: UIEvent) {
  guard let touchEvent = event.allTouches?.first else { return }
  switch touchEvent.phase {
  case .began:
    isSliderDragging = true
  case .ended:
    // ①Find the target playback time from the slider value
    let seconds = Double(sender.value) * itemDuration
    let timeScale = CMTimeScale(NSEC_PER_SEC)
    // From the target playback time, generate `CMTime` to actually change the playback time.
    let time = CMTime(seconds: seconds, preferredTimescale: timeScale)
    changePosition(time: time)
    isSliderDragging = false
  case .cancelled:
    isSliderDragging = false
  default: break
  }
}

private func changePosition(time: CMTime) {
  // Update Slider UI based on time value
  updateDurationSlider(time: time)
  let rate = avPlayer.rate
  // Temporarily stop while changing time
  avPlayer.rate = 0
  avPlayer.seek(to: time) { [weak self] completed in
  if !completed { return }
    // Play again when the changes are complete
    self?.avPlayer.rate = rate
  }
}
5. Fast forward / rewind for a specified number of seconds
This function, like the function in 4, fast forwards and rewinds a specified time from the current playback time. There are some parts in common with the implementation of 4. In this app, 10/15/30 seconds can be specified for verification.
private var offsetDefaultTime: Double = 15

@IBAction func back(_ sender: Any) {
  offsetTime(offset: -offsetDefaultTime)
}

@IBAction func forward(_ sender: Any) {
  offsetTime(offset: offsetDefaultTime)
}

private func offsetTime(offset: Double) {
  let timeScale = CMTimeScale(NSEC_PER_SEC)
  // Create a struct for `CMTime` based on the time (seconds) you want to adjust
  let rhs = CMTime(seconds: offset, preferredTimescale: timeScale)
  // Add or subtract the number of seconds for offset to the current time (avPlayer.currentTime()).
  let time = CMTimeAdd(avPlayer.currentTime(), rhs)
  changePosition(time: time)
}
6. Adjust the volume
Here, we will implement to adjust the volume of the video according to the value of the slider.
You can change the volume of the video by changing the value of avPlayer.volume (minimum value is 0, maximum value is 1).
@IBAction func onVolumeSliderValueChanged(_ sender: UISlider) {
  setVolume(volume: sender.value)
}

private func setVolume(volume: Float) {
  avPlayer.volume = volume
  volumeSlider.value = volume
}
Summary
During the research and implementation, I got a rough idea of how to use it.
However, there are various settings that can be made in more detail, so I’d like to gradually grasp them while developing them in the future.